Query to retrive the header information of the Sales Order Form is:
SELECT ooha.header_id, ooha.order_number, ott.NAME "ORDER TYPE",
hp.party_name "CUSTOMER", hca.account_number "CUSTOMER NUMBER",
ooha.ordered_date "DATE ORDERED", qh.NAME "PRICE LIST",
ooha.transactional_curr_code "CURRENCY",
ooha.cust_po_number "CUSTOMER PO",
ooha.freight_carrier_code "SHIPPING METHOD",
ooha.flow_status_code "STATUS", rtt.NAME "PAYMENT TERMS",
mp.organization_code "WARE HOUSE", ol.meaning "FREIGHT TERMS",
ol1.meaning "SHIPMENT PRIORITY", al.meaning "FOB",
rsa.NAME "SALESPERSON",
hcsua.LOCATION
','
hl.address2
','
hl.city
','
hl.state
','
hl.postal_code
','
hl.county "BILL TO LOCATION",
hcsua1.LOCATION
','
hl1.address2
','
hl1.city
','
hl1.state
','
hl1.postal_code
','
hl1.county "SHIP TO LOCATION"
FROM oe_order_headers_all ooha,
oe_transaction_types_tl ott,
qp_list_headers qh,
ra_terms_tl rtt,
mtl_parameters mp,
ra_salesreps_all rsa,
hz_cust_accounts hca,
hz_parties hp,
hz_parties hp1,
hz_locations hl,
hz_locations hl1,
hz_cust_acct_sites_all hcasa,
hz_cust_acct_sites_all hcasa1,
hz_cust_site_uses_all hcsua,
hz_cust_site_uses_all hcsua1,
hz_party_sites hps,
hz_party_sites hps1,
oe_lookups ol,
oe_lookups ol1,
ar_lookups al
WHERE 1 = 1
AND ooha.order_number = 10265
AND ooha.sold_to_org_id = hca.cust_account_id
AND ooha.order_type_id = ott.transaction_type_id
AND ott.LANGUAGE = USERENV ('LANG')
AND rtt.LANGUAGE = USERENV ('LANG')
AND rtt.term_id = ooha.payment_term_id
AND qh.list_header_id = ooha.price_list_id
AND mp.organization_id = ooha.ship_from_org_id
AND ooha.salesrep_id = rsa.salesrep_id
AND hca.party_id = hp.party_id
AND hca.party_id = hp1.party_id
AND ooha.invoice_to_org_id = hcsua.site_use_id(+)
AND hcsua.cust_acct_site_id = hcasa.cust_acct_site_id(+)
AND hcasa.party_site_id = hps.party_site_id(+)
AND hl.location_id(+) = hps.location_id
AND ooha.ship_to_org_id = hcsua1.site_use_id(+)
AND hcsua1.cust_acct_site_id = hcasa1.cust_acct_site_id(+)
AND hcasa1.party_site_id = hps1.party_site_id(+)
AND hl1.location_id(+) = hps1.location_id
AND ooha.freight_terms_code = ol.lookup_code
AND ooha.shipment_priority_code = ol1.lookup_code
AND al.lookup_code = ooha.fob_point_code;
Query to retrieve the line information of the Sales Order Form is:
SELECT oola.line_number "LINE NUMBER", oola.ordered_item "ORDERED ITEM",
oola.ordered_quantity "QTY", oola.order_quantity_uom "UOM",
oola.unit_selling_price "UNIT SELLING PRICE",
oola.cancelled_quantity "QTY CANCELLED",
oola.shipped_quantity "QTY SHIPPED", oola.tax_code "TAX CODE",
ott.NAME "LINE TYPE",
DECODE (opa.line_id,
NULL, DECODE (opa.credit_or_charge_flag,
'C', (-1) * opa.operand,
opa.operand
),
DECODE (opa.credit_or_charge_flag,
'C', DECODE (opa.arithmetic_operator,
'LUMPSUM', (-1) * (opa.operand),
(-1)
* ( oola.ordered_quantity
* opa.adjusted_amount
)
),
DECODE (opa.arithmetic_operator,
'LUMPSUM', opa.operand,
(oola.ordered_quantity * opa.adjusted_amount
)
)
)
) "LINE_CHARGES",
ol.meaning "CALCULATE PRICE FLAG", oola.pricing_quantity,
oola.unit_selling_price, oola.unit_list_price, oola.tax_value,
(oola.shipped_quantity) * (oola.unit_selling_price) "LINE TOTAL"
((oola.shipped_quantity) * (oola.unit_selling_price)
)
+ (DECODE (opa.line_id,
NULL, DECODE (opa.credit_or_charge_flag,
'C', (-1) * opa.operand,
opa.operand
),
DECODE (opa.credit_or_charge_flag,
'C', DECODE (opa.arithmetic_operator,
'LUMPSUM', (-1) * (opa.operand),
(-1)
* ( oola.ordered_quantity
* opa.adjusted_amount
)
),
DECODE (opa.arithmetic_operator,
'LUMPSUM', opa.operand,
(oola.ordered_quantity * opa.adjusted_amount
)
)
)
)
) "ORDER TOTAL"
FROM oe_order_lines_all oola,
oe_transaction_types_tl ott,
oe_price_adjustments opa,
oe_order_headers_all ooha,
oe_lookups ol
WHERE 1 = 1
AND oola.line_type_id = ott.transaction_type_id
AND opa.header_id = ooha.header_id
AND opa.line_id = oola.line_id(+)
AND opa.list_line_type_code = 'FREIGHT_CHARGE'
AND opa.applied_flag = 'Y'
AND ott.LANGUAGE = USERENV ('LANG')
AND oola.header_id = 1547
AND ol.lookup_type = 'CALCULATE_PRICE_FLAG'
AND oola.calculate_price_flag = ol.lookup_code;
Sunday, November 28, 2010
Thursday, November 18, 2010
Oracle Reports 6i
Oracle Reports 6i
In this tutorial you will learn about Introduction to Oracle Reports Builder, Report file storage formats, Oracle Reports Builder Tools, Report Wizard, Triggers in Reports, Types of Triggers and Case Study - Creating a Tabular report.Introduction to Oracle Reports Builder
Oracle Reports Builder is a powerful enterprise reporting tool used to build reports that dynamically retrieve data from the database, format, display and print quality reports. Reports can be stored in File or Database (Report Builder Tables).Report file storage formats
.rdf Report• Binary File Full report definition (includes source code and comments)
• Modifiable through Builder. Binary, executable Portable if transferred as binary.
• PL/SQL recompiles on Open/Run
.rep Report • Binary Run-Only File
• No source code or comments. Not modifiable binary, executable.
• Report Executables
RWBLD60 Report Builder
RWRUN60 Report Runtime
RWCON60 Report Converter/Compiler [File => Administration => Compile (rdf to rep)/Convert]
Oracle Reports Builder Tools
Oracle Reports Builder comes with the following components• Object Navigator
• Property Palette
• Data Model Editor
• Layout Model Editor
• Parameter Form Editor
Object Navigator
The Object Navigator shows a hierarchical view of objects in the report. Each item listed is called a node and represents an object or type of object the report can contain or reference.
Property Palette A Property Palette is a window that displays the settings for defining an Oracle reports object.
Data Model Editor
To specify data for a report, a data model should be defined. A data model is composed of some or all of the following data definition objects.
Queries Queries are SQL Select statements that fetch data from the oracle database. These statements are fired each time the report is run.
Groups
Groups determine the hierarchy of data appearing in the report and are primarily used to group columns selected in the query. Oracle report automatically creates a group for each query.
Data Columns Data columns contain the data values for a report. Default data columns, corresponding to the table columns included in each query’s SELECT list are automatically created by oracle reports. Each column is placed in the group associated with the query that selected the column.
Formula Columns Formulas can be entered in formula columns to create computed columns. Formulas can be written using PL/SQL syntax. Formula columns are generally preceded by CF_ to distinguish from other columns.
Summary Columns Summary columns are used for calculating summary information like sum, average etc. This column uses a set of predefined oracle aggregate functions. Summary columns are generally preceded by CS_ to distinguish them from other columns.
Data Links
Data links are used to establish parent-child relationships between queries and groups via column matching.
Layout Model Editor A report layout editor contains the following layout objects
Frames
Frames surround other layout objects, enabling control of multiple objects simultaneously
Repeating Frames Repeating frames acts as placeholders for groups (I.e repeating values) and present rows of data retrieved from the database. Repeating frames repeat as often as the number of rows retrieved.
Fields Fields acts as placeholders for columns values. They define the formatting attributes for all columns displayed in the report.
Boilerplate
Boilerplate consists of text (label of the column) and graphics that appear in a report each time it is run.
Parameter Form Editor Parameter form is a runtime form used to accept inputs from the user.
Parameters
Parameters are variables for a report that accept input from the user at runtime. These parameter values can then be used in the SQL select statements to retrieve data conditionally. Oracle reports creates a set of system parameters at runtime namely report destination type, number of copies etc.
Report Wizard
• When we create a default Tabular Report using report wizard, the wizard will take you through the below mentioned pages• Report Style Tabular, Form-Like, Mailing Label, Form Letter, Group Left, Group Above, Matrix, Matrix with Group
• Query Type Choose whether to build a SQL query or an Express query.
• Data Enter a SELECT statement to retrieve the report data
• Displayed Fields Select the fields that you want to display in the output.
• Fields to Total Select the fields that you want to summarize.
• Labels for Fields Alter the labels that appear for each field and the width of each field.
• Template Select the template that you want to use for this report. A template contains standard information such as company logo, date, and so on.
Note: The above steps are different for each report style.
Group Left & Have an additional page: ‘Groups’
Group Above styles
Matrix Reports styles Have 3 additional pages: ‘Matrix Rows’ ‘Columns’ ‘Cells’
Mailing Label & Have 4 pages: ‘Report Style’ ‘Data’
Form Letter styles ‘Text’ ‘Template’
The difference between Mailing Labels and Form Letters is, Mailing Label shows multiple records on one page while Form Letter shows one record on each page.
Triggers in Reports
Types of Triggers
Formula Triggers: Formula triggers are PL/SQL functions that populate columns of type Formula.Format Triggers: Format triggers are PL/SQL functions executed before the object is formatted. These triggers are used to dynamically change the formatting attributes and used to conditionally print and not to print a report column value. These triggers return Boolean values TRUE or FALSE. If the return value of the format trigger is FALSE, the value is not displayed.
Action Triggers: Action triggers are used to perform user-defined action. These triggers do not return any value.
Validation Triggers: Validation triggers are PL/SQL functions that are executed when a parameter value is entered and the cursor moves to the next parameter. These triggers return Boolean value TRUE / FALSE.
Report Triggers: Report triggers enable execution of PL/SQL functions at specific time during execution and formatting of report.
Before Parameter Form Fires before the Runtime Parameter Form are displayed. Can access the PL/SQL global variables, report level columns and manipulate accordingly.
After Parameter Form
Fires after the Runtime Parameter form are displayed. Used to validate the parameter values.
Before Report
Fires before the report is executed but after the queries is parsed and date is fetched.
Between Pages Fires before each page of the report are formatted, except the very first page. This page is used to customize page formatting.
After Report
Fires after the report previewer are exited, or after report output is sent to a specified destination.
Case Study - Create a Tabular report
After invoking the report builder and connecting to the database invoke Report wizard.Click on Tools… Report Wizard… to start the report wizard for a new report. Report wizard shows the following tab pages to enter information required for report.
Style Totals Data
Labels Fields Template
In the Style tab select ‘Tabular’ as the report style and Click Next
The Data tab allows creation of an SQL statement using Query Builder or to enter the SQL statement in the multi line edit box provided in the Data tab.
Click Next
Click Next
This will take you to the next tab if your SQL statement syntax is correct.
Fields tab is used to specify the fields that must be displayed in tabular format. Select all fields by clicking on >> icon.
Click Next
Click Next
The Totals tab is displayed that allows creation of Summary columns using aggregate functions.
This report does not include totals for the selected fields and thus Click Next.
The Labels tab is displayed that enable us to change the labels of the columns.
Click Next
The Templates tab is displayed that enable us to create report from templates. There are number of pre-determined templates available in Oracle Reports Builder.
Select Corporate 1 as the template. Click Finish
Click on File. Save to save the report, specify the report name and click OK.
Run the report!!
Concurrent Program Parameters
The 3rd step in defining concurrent program is to define the parameters. To do this, click on the Parameters button as shown at the bottom the form in figure 4. The following screen (figure 5) is displayed when you click on parameters button. This screen is used to define the parameters in the concurrent program.

Figure 5. Parameter Window
Field Description
i) Program – will be defaulted from Concurrent Programii) Application – will be defaulted from Concurrent Program
iii) Conflicts Domain - Enter the parameter which will hold the value of the conflict domain of the program.
iv) Security Group - This field is for HRMS security only.
v) Seq – Enter sequence number for the parameter
vi) Parameter – name of the parameter, will be displayed in parameter entry screen
vii) Description – description about the usage of the parameter
viii) Enabled – check box to enable or disable the parameter. Disable a parameter when you don’t want to use it.
ix) Value set – enter the name of the value set which you want to use to validate the value enter in the parameter field.
x) Description – will be defaulted from value set definition
xi) Default Type – choose the default type for the default value of the parameter. Possible default types are
xii) Display size – Enter the field length in characters for this parameter. The user sees and fills in the field in the Parameters window of the Submit Requests window.
xiii) Token - For a parameter in an Oracle Reports program, the keyword or parameter appears here. The value is case insensitive. For other types of programs, you can skip this field.
- Constant : The default value can be any literal value.
- Profile : The default value is the current value in the user profile option defined in the Default Value field. Use the profile option name, not the end–user name. You do not need to include $PROFILE$.
- SQL Statement : The default value is determined by the SQL statement you defined in the Default Value field.
- Segment : The default value is the value entered in a prior segment of the same parameter window.
To navigate to this form, click on the Copy To button on the bottom of the form shown in figure 4. This window can be used to copy the definition of the concurrent program. Give the program name to copy the definition.

Figure 8. Copy To Form
Field Description
i) Program – Enter the program name to be copiedii) Short Name – Short Name of the program to be copied
iii) Application – Application name of the concurrent program to be copied
iv) Include Incompatible programs - Check this box if you want incompatibilities to be copied
v) Include Parameters – Check this box if you want parameters to be copied.
4. Incompatible Programs Window :
To navigate to this form, click on the Incompatibilities button on the bottom of the form shown in figure 4. This window is used for defining the incompatibilities of the concurrent program. Identify concurrent programs that should not run with your concurrent program as they might interfere with its execution.

Field Description
i) Program – Defaulted from Concurrent Programs Windowii) Application – Defaulted from Concurrent Programs Window
iv) Name – Name of the concurrent program which is incompatible to the defined concurrent program.
v) Scope – Used to identify if concurrent program is incompatible if the program or also with its child requests.
5. Session Control :
To navigate to this form, click on the Session Control button on the bottom of the form shown in figure 4. This is a new functionality given in 11.5.10 to control the database session while executing concurrent program using following three parameters. The form would look like as shown in figure 7.

Field Description
Oracle APPS Concurrent Processing- 2
2. Concurrent Program :
Once you have defined the executable, the second step is to define the concurrent program. To define a concurrent program, you need to open the form using the navigation path below.
Navigation –Developer -> Concurrent ->Program

Figure 4. Concurrent Program Form Navigation
The form would look like as shown in the figure 4 below.
Figure 4. Concurrent Program Form
Field Description
i) Program – Give user friendly name for your concurrent program. This name will be displayed in Requests submission screen while submitting the requests.
ii) Short Name – Give short name for concurrent program. This is used within the database tables in oracle applications. It’s a common practice to have the Short name same for the executable and the concurrent program.
iii) Application – Give the application to which the concurrent program belongs to. E.g you want some program to run from oracle payables then account payables should be entered as application name.
iv) Description - Give the brief description of the concurrent program.
v) Executable - Enter the short name of the executable (Defined in Executables Screen) you want to attach to this concurrent program.
vi) Method - will be defaulted once you enter executable short name
vii) Options - will be defaulted once you enter executable short name
vi) Method - will be defaulted once you enter executable short name
vii) Options - will be defaulted once you enter executable short name
Normally default values are given for the other fields. Following is the significance of these fields.
viii) Request Type – Concurrent program can be associated to a predefined request type so that only few concurrent managers can run the program.
ix) Incrementor – To be used by Oracle only.
x) MLS Function - This feature allows the program to be submitted once by the user but runs it in the multiple languages.
xi) Use In SRS – Only when this check box is checked the Concurrent Program would be available in Standard Request Submission (SRS) through the request group.
xii) Allow Disable Value – This will allow the disabled values in the value sets to be used while entering the values of the parameters in the Concurrent Program.
xiii) Run Alone – Indicates that program is incompatible with all other concurrent programs and should be run alone.
xiv) Enable Trace – This will enable the SQL trace for the concurrent program and will generate the trace file when concurrent program is run. Only used in development environments to check the performance of the concurrent program.
xiv) Enable Trace – This will enable the SQL trace for the concurrent program and will generate the trace file when concurrent program is run. Only used in development environments to check the performance of the concurrent program.
xv) Restart on system Failure – This option is used to indicate that concurrent program should automatically be started when concurrent manager is restored after the system failure.
xvi) NLS Compliant – This box is checked if the program allows for a user to submit request of the program that will reflect a language and territory that are different from the language and territory that the users are operating in.
xvi) NLS Compliant – This box is checked if the program allows for a user to submit request of the program that will reflect a language and territory that are different from the language and territory that the users are operating in.
xvii) Output Format – Format in which output should be printed. Possible format values are
- HTML
- TEXT
- PS (Post Script)
- PCL(HP’s Printer Control Language)
xix) PRINT – Whether you want the output to be sent to printer for printing.
xx) Column / Rows – Column and Row length of the concurrent program output. Oracle Applications uses this information to decide the print style.
xxi) Style Required – Print Style
xxii) Printer – A particular printer on which output should be sent.
Save the data that you have entered using Ctrl+S or File à Save.
Oracle APPS Concurrent Processing-1
Concurrent programs can be scheduled to run or manually run in oracle applications. In Oracle Applications, concurrent processing simultaneously executes programs running in the background with online operations to fully utilize your hardware capacity, hence the name ‘Concurrent Processing’. You can write a program (called a ”concurrent program”) that runs as a concurrent process. Typically, you create concurrent programs for long–running, data–intensive tasks, such as posting a journal or generating a report.
An execution method can be a PL/SQL Stored Procedure, an Oracle Tool such as Oracle Reports or SQL*Plus, a spawned process, or an operating system host language.

Figure 1. Executable Form Navigation
You will see the form as shown in figure 2 below.

Figure 2. Executable Form
vi) Executable File name – This should contain the name of the executable file. In case of PL/SQL Stored procedure or Java Stored Procedure it should be the fully defined name of the stored procedure.
vii) Subroutine Name – This field is only used when executable type is spawned or immediate.
viii) Execution File Path -
ix) The Stage Function Parameters button opens a window that allows you to enter parameters for the Request Set Stage Function. This button is only enabled when you select Request Set Stage Function as your Execution Method.
Concurrent Programs
A concurrent program is an instance of an execution file, along with parameter definitions and incompatibilities. Concurrent programs use concurrent program executables to locate the correct execution file. Several concurrent programs may use the same execution file to perform their specific tasks, each having different parameter defaults and incompatibilities.Concurrent Program Executable
A concurrent program executable links an execution file or and the method used to execute it with a defined concurrent program. Under Concurrent Processing, an execution method may be a program written in a standard language, a reporting tool, or an operating system language.An execution method can be a PL/SQL Stored Procedure, an Oracle Tool such as Oracle Reports or SQL*Plus, a spawned process, or an operating system host language.
Concurrent Program Execution File
A concurrent program execution file is an operating system file or database stored procedure which contains your application logic and can be executed by either invoking it directly on the command line or by invoking a program which acts upon it. For example, you run a Pro*C program by invoking it on the command line. You run a SQL script by running SQL*Plus and passing the name of the SQL script without the .sql extension.Steps to Create a Concurrent Pro
1. Executable :
The first step in creating a concurrent program in oracle applications is to create the concurrent program executable. To do this, navigate to Application Developer responsibility after you login to Oracle Applications. To login, you can take the help of the ‘Topic11 - Oracle Applications Login Document’.
To open the Executable form follow the below mentioned navigation path.
Application Developer à Concurrent à Executable.
Figure 1. Executable Form Navigation
You will see the form as shown in figure 2 below.
Figure 2. Executable Form
Field Description
i) Executable - Enter executable name here. Enter any user friendly name.
ii) Short Name - Enter short name for your executable. This is used for mapping the executable with the concurrent program. Usually executable name are of 8 characters.
iii) Application - Give the application to which the executable belongs to. E.g. you want some program to run from oracle payables then account payables should be entered as application name.
iv) Description - Give the brief description of the executable in this field.
v) Execution Method - Here you need to choose the appropriate execution method for your executable. Following are the possible execution methods which are commonly used in oracle applications.
- Oracle Reports – used for the RDF reports
- Host – used for shell scripts, basically the language of the host operating system
- PL/SQL Stored procedure – used to run the stored procedure through oracle applications
- SQL*Loader – used to run the sql loader programs
- SQL*Plus - used to run the anonymous PL/SQL blocks. It will get executed in the same fashion as you are running on SQL Plus.
- Java Stored Procedure – The execution file is a Java stored procedure.
- Java Concurrent Program – Used for program written in Java.
- Spawned – used for c or pro*c Program. Mainly used by standard oracle interfaces.
- Perl Concurrent Program – used for programs written in CGI Perl.
- Request Set Stage Function – PL/SQL stored function that can be used to calculate the completion statuses of request set stages.
- Immediate – execution file is a program written to run as subroutine of the concurrent manager. Oracle doesn’t recommend use of this executable type.
- Multi-Language function – execution file is an MLS function that supports running concurrent program in multiple languages.
vi) Executable File name – This should contain the name of the executable file. In case of PL/SQL Stored procedure or Java Stored Procedure it should be the fully defined name of the stored procedure.
vii) Subroutine Name – This field is only used when executable type is spawned or immediate.
viii) Execution File Path -
ix) The Stage Function Parameters button opens a window that allows you to enter parameters for the Request Set Stage Function. This button is only enabled when you select Request Set Stage Function as your Execution Method.
Tuesday, November 16, 2010
Script to update Oracle project tasks
DECLARE
l_msg_count NUMBER;
l_msg_data VARCHAR2 (2000);
l_return_status VARCHAR2 (1);
l_pm_product_code VARCHAR2 (10);
l_out_pa_task_id NUMBER;
l_out_pm_task_reference VARCHAR2 (2000);
l_output VARCHAR2 (2000);
l_msg_dummy VARCHAR2 (2000);
api_error EXCEPTION;
n NUMBER := 0;
l_pa_project_id NUMBER := :project_id;
BEGIN
pa_interface_utils_pub.set_global_info (p_api_version_number => 1.0,
p_responsibility_id => :Responsibility_id,
p_user_id => :User_id,
p_msg_count => l_msg_count,
p_msg_data => l_msg_data,
p_return_status => l_return_status
);
pa_project_pub.update_task
(p_api_version_number => '1.0',
p_commit => 'F',
p_init_msg_list => 'F',
p_msg_count => l_msg_count,
p_msg_data => l_msg_data,
p_return_status => l_return_status,
p_pm_product_code => l_pm_product_code,
p_pa_project_id => l_pa_project_id,
p_pa_task_id => :pa_task_id,
-- p_task_description => 'TEST DESC1',
p_tasks_dff => 'N',
p_out_pa_task_id => l_out_pa_task_id,
p_out_pm_task_reference => l_out_pm_task_reference
);
COMMIT;
IF l_return_status <> 'S'
THEN
FOR n IN 1 .. l_msg_count
LOOP
fnd_msg_pub.get (n, fnd_api.g_false, l_msg_data, l_msg_dummy);
l_output := (TO_CHAR (n) || ': ' || l_msg_data);
DBMS_OUTPUT.put_line
( 'Error: API Error while updating the Task: '
|| l_output
);
COMMIT;
END LOOP;
ELSE
DBMS_OUTPUT.put_line ('Sucessfully Update the task');
COMMIT;
END IF;
EXCEPTION
WHEN api_error
THEN
DBMS_OUTPUT.put_line ('API Error in Project: ');
WHEN OTHERS
THEN
DBMS_OUTPUT.put_line ('Other Error in Project: ' || SQLERRM);
END;
ORA-04091: Table is Mutating
Many a times you must have encountered the issue ORA-04091: table SYSTEM.TEST1 is mutating, trigger/function may not see it.
This issue basically persists in PLSQL triggers. At one time I was also hit by the same issue. One of my friend “Nikhil Tungare – PLSQL Guru” helped me to get rid of this issue.
Here is how the error can be reproducible.
SQL> create table test1
2 (col1 varchar2(10),
3 col2 number);
Table created.
SQL> create table test1_audit
2 (col1 number,
3 time date);
Table created.
SQL> create or replace trigger mutat_trig
2 after insert on test1
3 for each row
4 declare
5 id number;
6 begin
7 select col2 into id from test1
8 where col2 = :NEW.col2;
9 insert into test1_audit values (id, sysdate);
10 end;
11 /
Trigger created.
SQL> insert into test1 values(‘test’,1);
insert into test1 values(‘test’,1)
*
ERROR at line 1:
ORA-04091: table SYSTEM.TEST1 is mutating, trigger/function may not see it
ORA-06512: at “SYSTEM.MUTAT_TRIG”, line 4
ORA-04088: error during execution of trigger ‘SYSTEM.MUTAT_TRIG’
The reason for this error is because, you have a table and you are inserting a row. Now as soon as you insert a row, a trigger is fired which will select the inserted data. This causes a problem because the data is inconsistent, it is not yet commited. Oracle engine allows only commited data to be queried.
This problem comes with row level trigger only, because row level trigger will gets fired immidiately as soon as you insert a row in a table. Statement level trigger will get fired after every statement.
To get rid of this problem and still use row level trigger, we have the solution as given below.
We need to create following triggers to avoide this issue.
1. After RowLevel
2. After Statement Level
Also we need to declare a global variable to store the value of ID that we will select. This global variable should be declared in package, so that we can access it when ever required.
Create a package, which will hold global variable
SQL> CREATE OR REPLACE PACKAGE test_package AS
2 id test1.col2%TYPE;
3 END;
4 /
Package created.
1) Creating After Row level trigger to populate the global variable with required value
SQL> create or replace trigger mutat_trig
2 after insert on test1
3 for each row
4 begin
5 test_package.id := :new.col2;
6 end;
7 /
Trigger created.
2) Create a After Statement level trigger to insert into test1_audit table.
SQL> create or replace trigger insert_audit
2 after insert on test1
3 begin
4 insert into test1_audit values (test_package.id, sysdate);
5 end;
6 /
Trigger created.
Trying to insert value now.
SQL> insert into test1 values(‘test’,1);
1 row created.
SQL> commit;
Commit complete.
SQL> select * from test1_audit;
COL1 TIME
———- ———
1 30-AUG-07
So always avoid selecting the value from the table, which is not yet committed. Thanks for Nikhil for helping me figure out this very closely.
Oracle Inventory Tables
MTL_PARAMETERS:
It maintains a set of default options like general ledger accounts; locator, lot, and serial controls; inter–organization options; costing method; etc. for each organization defined in Oracle Inventory.
Each organization’s item master organization (MASTER_ORGANIZATION_ID) and costing organization (COST_ORGANIZATION_ID) are maintained here. You specify which manufacturing calendar the organization will use (CALENDAR_CODE), as well as the set of exceptions to this calendar (CALENDAR_EXCEPTION_SET_ID).
NEGATIVE_INV_RECEIPT_CODE indicates whether this organization will allow negative balances in inventory. It is used in the transaction system to ensure, for example, that you do not over–issue a particular item (if you have indicated that negative balances are not allowed). For lot number and serial number auto–generation, you can specify whether you want the numbers generated from defaults defined at the organization level or the item level (LOT_NUMBER_GENERATION,
SERIAL_NUMBER_GENERATION). You can also specify uniqueness constraints for lot numbers (LOT_NUMBER_UNIQUENESS) and serial numbers (SERIAL_NUMBER_TYPE). Among the accounting defaults that can be defined here are valuation accounts, receiving accounts, profit and loss accounts, and inter– organization transfer accounts.
MTL_SYSTEM_ITEMS:
This is the definition table for items. This table holds the definitions for inventory items, engineering items, and purchasing items. You can specify item–related information in fields such as: Bill of Material, Costing, Purchasing, Receiving, Inventory, Physical attributes, General Planning, MPS/MRP Planning, Lead times, Work in Process, Order Management, and Invoicing. You can set up the item with multiple segments, since it is implemented as a flex field. Use the standard ’System Items’ flex field that is shipped with the product to configure your item flex field. The flex field code is MSTK.
The primary key for an item is the INVENTORY_ITEM_ID and ORGANIZATION_ID. Therefore, the same item can be defined in more than one organization. Each item is initially defined in an item master organization. The user then assigns the item to other Organizations that need to recognize this item; a row is inserted for each new organization the item is assigned to. Many columns such as MTL_TRANSACTIONS_ENABLED_FLAG and BOM_ENABLED_FLAG correspond to item attributes defined in then MTL_ITEM_ATTRIBUTES table.
Two units of measure columns are stored in MTL_SYSTEM_ITEMS table. PRIMARY_UOM_CODE is the 3–character unit that is used throughout Oracle Manufacturing. PRIMARY_UNIT_OF_MEASURE is the 25–character unit that is used throughout Oracle Purchasing. Items now support multilingual description. MLS is implemented with a pair of tables: MTL_SYSTEM_ITEMS_B and MTL_SYSTEM_ITEMS_TL. Translations table (MTL_SYSTEM_ITEMS_TL) holds item descriptions in multiple languages. DESCRIPTION column in the base table (MTL_SYSTEM_ITEMS_B) is for backward compatibility and is maintained in the installation base language only.
MTL_ITEM_STATUS
MTL_ITEM_STATUS is the definition table for material status codes. Status code is a required item attribute. It indicates the status of an item, i.e., Active, Pending, Obsolete. The status optionally controls several ’function controlling’ item attributes (status attributes) and can be used to disable the item from being used by the various application products.
MTL_UNITS_OF_MEASURE_TL
MTL_UNITS_OF_MEASURE_TL is the definition table for both the 25–character and the 3–character units of measure. The base_uom_flag indicates if the unit of measure is the primary unit of measure for the uom_class. Oracle Inventory uses this table to keep track of the units of measure used to transact an item. This table is also used by Oracle Purchasing, Oracle Order Management and Oracle Shipping Execution.
MTL_ITEM_LOCATIONS
MTL_ITEM_LOCATIONS is the definition table for stock locators. The associated attributes describe which sub inventory this locator belongs to, what the locator physical capacity is, etc. The locator is a key flex field. The Flex field Code is MTLL.
Entity 2
MTL_ITEM_CATEGORIES
This table stores the item assignments to categories within a category set. For each category assignment, this table stores the item, the category set, and the category. Items may be assigned to multiple categories and category sets but may be assigned to only one category in a given category set. This table may be populated through the Master Items and Organization items windows. It can also be populated by performing item assignments when a category set is defined. It is also populated when an item is transferred from engineering to manufacturing.
MTL_CATEGORIES
This is the code combinations table for item categories. Items are grouped into categories within the context of a category set to provide flexible grouping schemes. The item category is a key flexfield with a flex code of MCAT. Item categories now support multilingual category description. MLS is implemented with a pair of tables: MTL_CATEGORIES_B and MTL_CATEGORIES_TL.
MTL_CATEGORY_SETS
MTL_CATEGORY_SETS contains the entity definition for category sets. A category set is a categorization scheme for a group of items. Items may be assigned to different categories in different category sets to represent the different groupings of items used for different purposes. An item may be assigned to only one category within a category set, however, STRUCTURE_ID identifies the flexfield structure associated with the category set. Only categories with the same flexfield structure may be grouped into a category set.
CONTROL_LEVEL defines whether the category set is controlled at the item or the item/organization level. When an item is assigned to an item level category set within the item master organization, the category set assignment is propagated to all other organizations to which the item is assigned. VALIDATE_FLAG defines whether a list of valid categories is used to validate category usage within the set. Validated category sets will not allow item assignment to the category set in categories that are not in a predefined list of valid categories. Category Sets now support multilingual category set name and description. MLS is implemented with a pair of tables: MTL_CATEGORY_SETS_B and MTL_CATEGORY_SETS_TL.
Entity 3
MTL_DEMAND
This table stores demand and reservation information used in Available To Promise, Planning and other Manufacturing functions. There are three major row types stored in the table: Summary Demand rows, Open Demand Rows, and Reservation Rows.
Summary Demand is direct demand for an item within an organization on a particular date that originated from a particular source. For hard reservations there are several columns which further define what the reservation is for, and where it is being placed. Currently, four sources of demand are supported, Sales Order, Account, Account Alias, and User Defined transaction sources. Five different types of demand, denoted by DEMAND_TYPE column, are used. These five types are Model, Option Class, Option Item, Configuration Item and Derived. Derived demand rows are inserted by BOM Demand exploder when demanded item has ATP table components. Each Summary Demand row may be associated with one or more Reservation rows. Reservation may be placed against a particular inventory control (that is, specific sub inventory, locator, revision and lot) against any sources (that is, Account Number, Account Alias, Sales Order or even User–Defined sources). Each Summary Demand row may be associated with one or more detailed rows. The detailed rows consist of reservations and open demand. A reservation row represents a firm promise of a supply source. Currently, two types of reservation are supported, reservations to on–hand, and reservations to WIP jobs. Each summary demand row may be associated with one and only one open demand row. Open Demand rows represent the un–reserved portion of the Summary Demand.
MTL_SECONDARY_INVENTORIES
MTL_SECONDARY_INVENTORIES is the definition table for the sub inventory. A sub inventory is a section of inventory, i.e., raw material, finished goods, etc. Sub inventories are assigned to items (in a many to one relationship), indicating a list of valid places where this item will physically exist in inventory. Other attributes include general ledger accounts, demand picking order, locator type, availability type, and reservable type. You can also specify whether this sub inventory is an expense or asset sub inventory (ASSET_INVENTORY) or whether quantities are tracked (QUANTITY_TRACKED).
MTL_ONHAND_QUANTITIES
MTL_ONHAND_QUANTITIES stores quantity on hand information by control level and location. MTL_ONHAND_QUANTITIES is maintained as a stack of receipt records, which are consumed by issue transactions in FIFO order. The quantity on hand of an item at any particular control level and location can be found by summing TRANSACTION_QUANTITY for all records that match the criteria. Note that any transactions which are committed to the table MTL_MATERIAL_TRANSACTIONS_TEMP are considered to be played out as far as quantity on hand is concerned in Inventory transaction forms. All our Inquiry forms and ABC compile are only based on MTL_ONHAND_QUANTITIES.MTL_ONHAND_QUANTITIES has two columns, CREATE_TRANSACTION_ID and UPDATE_TRANSACTION_IDs to join to MTL_MATERIAL_TRANSACTIONS.TRANSACTION_ID the transactions that created the row and the transaction that last updated a row.
Entity 4
MTL_TRANSACTION_TYPES
MTL_TRANSACTION_TYPES contains seeded transaction types and the user defined ones. USER_DEFINED_FLAG will distinguish the two. The table also stores the TRANSACTION_ACTION_ID and TRANSACTION_SOURCE_TYPE_ID that is associated with each transaction type.
MTL_MATERIAL_TRANSACTIONS
MTL_MATERIAL_TRANSACTIONS stores a record of every material transaction or cost update performed in Inventory.
Records are inserted into this table either through the transaction processor or by the standard cost update program. The columns
TRANSACTION_TYPE_ID, TRANSACTION_ACTION_ID, TRANSACTION_SOURCE_TYPE_ID, TRANSACTION_SOURCE_ID and TRANSACTION_SOURCE_NAME describe what the transaction is and against what entity it was performed. All accounting journal entries for a given transaction are stored in MTL_TRANSACTION_ACCOUNTS, joined by the column TRANSACTION_ID. If the item is under lot control then the lot records are stored in
MTL_TRANSACTION_LOT_NUMBERS, joined by the column TRANSACTION_ID. If the item is under serial control then the serial records are stored in MTL_UNIT_TRANSACTIONS, joined by the column TRANSACTION_ID. The Item revision and locator control are stored in the columns REVISION and LOCATOR_ID respectively. Transfer transactions are represented as two single records in the table. They are related through the column TRANSFER_TRANSACTION_ID, which contains the TRANSACTION_ID of the other transaction in the transfer. The index MTL_MATERIAL_TRANSACTIONS_UPGD is used only during install and upgrade, and will be dropped during the course thereof, but is included here for completeness.
Oracle Purchasing Tables
PO_REQUISITION_HEADERS_ALL REQUISITION_HEADER_ID,
PREPARER_ID,
SEGMENT1,
SUMMARY_FLAG,
ENABLED_FLAG
Stores information about requisition headers. You need one row for each requisition header you create. Each row contains the requisition number, preparer, status, and description.SEGMENT1 is the number you use to identify the requisition in forms and reports (unique).
PO_REQUISITION_LINES_ALL
REQUISITION_LINE_ID,
REQUISITION_HEADER_ID,
LINE_NUM,
LINE_TYPE_ID,
CATEGORY_ID,
ITEM_DESCRIPTION,
UNIT_MEAS_LOOKUP_CODE,
UNIT_PRICE,
QUANTITY,
DELIVER_TO_LOCATION_ID,
TO_PERSON_ID,
SOURCE_TYPE_CODE
Stores information about requisition lines, Line number, item number, item category, item description, need–by date, deliver–to location, item quantities, units, prices, requestor, notes, and suggested supplier information for the requisition line.
LINE_LOCATION_ID - purchase order shipment line on which you placed the requisition. it is null if you have not placed the requisition line on a purchase order.
BLANKET_PO_HEADER_ID and BLANKET_PO_LINE_NUM store the suggested blanket purchase agreement or catalog quotation line information for the requisition line.
PARENT_REQ_LINE_ID contains the REQUISITION_LINE_ID from the original requisition line if you exploded or multistoried this requisition line.
PO_HEADERS_ALL PO_HEADER_ID,
AGENT_ID,
AGENT_ID,
TYPE_LOOKUP_CODE,
SEGMENT1,
SUMMARY_FLAG,
ENABLED_FLAG
Information for your purchasing documents.There is six types of documents that use PO_HEADERS_ALL
RFQs,
Quotations,
Standard purchase orders,
planned purchase orders,
Blanket purchase orders,
Contracts, can uniquely identify a row in PO_HEADERS_ALL using SEGMENT1 and TYPE_LOOKUP_CODE or using PO_HEADER_ID.BLANKET_TOTAL_AMOUNT for blanket purchase orders or contract purchase orders.
If we use copy document Oracle Purchasing stores the foreign key to your original RFQ in FROM_HEADER_ID.
PO_LINES_ALL PO_LINE_ID,
PO_HEADER_ID,
LINE_TYPE_ID,
LINE_NUM
Stores current information about each purchase order line. CONTRACT_NUM reference a contract purchase order from a standard purchase order line.
PO_VENDORS VENDOR_ID,
VENDOR_NAME,
SEGMENT1,
SUMMARY_FLAG,
ENABLED_FLAG
Information about your suppliers. Purchasing, receiving, payment, accounting, tax, classification, and general information.
PO_VENDOR_SITES_ALL VENDOR_SITE_ID,
VENDOR_ID,
VENDOR_SITE_CODE
Information about your supplier sites. a row for each supplier site you define. Each row includes the site address, supplier reference, purchasing, payment, bank, and general information. Oracle Purchasing uses this information to store supplier address information.
PO_DISTRIBUTIONS_ALL PO_DISTRIBUTION_ID,
PO_HEADER_ID,
PO_LINE_ID,
LINE_LOCATION_ID,
SET_OF_BOOKS_ID,
CODE_COMBINATION_ID,
QUANTITY_ORDERED,
DISTRIBUTION_NUM
Contains accounting distribution information for purchase order shipment line. You need one row for each distribution line you attach to a purchase order shipment.
There are four types of documents using distributions in Oracle Purchasing:
Standard Purchase Orders,
Planned Purchase Orders,
Planned Purchase Order Releases,
Blanket Purchase Order Releases
Includes the destination type, requestor ID, quantity ordered and deliver–to location for the distribution.
PO_RELEASES_ALL PO_RELEASE_ID,
PO_HEADER_ID,
RELEASE_NUM,
AGENT_ID,
RELEASE_DATE
Contains information about blanket and planned purchase order releases. You need one row for each release you issue for a blanket or planned purchase order. Each row includes the buyer, date, release status, and release number. Each release must have at least one purchase order shipment
PO_VENDOR_CONTACTS VENDOR_CONTACT_ID,
VENDOR_SITE_ID
Stores information about contacts for a supplier site. You need one row for each supplier contact you define. Each row includes the contact name and site.
PO_ACTION_HISTORY OBJECT_ID,
OBJECT_TYPE_CODE,
OBJECT_SUB_TYPE_CODE,
SEQUENCE_NUM
Information about the approval and control history of your purchasing documents. There is one record in this table for each approval or control action an employee takes on a purchase order, purchase agreement, release, or requisition.
Stores object_id -- Document header identifier,
OBJECT_TYPE_CODE --- Document type,
OBJECT_SUB_TYPE_CODE --Document subtype
SEQUENCE_NUM --Sequence of the approval or control action for a document
PO_REQ_DISTRIBUTIONS_ALL DISTRIBUTION_ID,
REQUISITION_LINE_ID,
SET_OF_BOOKS_ID,
CODE_COMBINATION_ID,
REQ_LINE_QUANTITY,
DISTRIBUTION_NUM
Stores information about the accounting distributions associated with each requisition line.
PO_LINE_LOCATIONS_ALL LINE_LOCATION_ID,
LAST_UPDATE_DATE,
LAST_UPDATED_BY,
PO_HEADER_ID,
PO_LINE_ID,
SHIPMENT_TYPE
Contains information about purchase order shipment schedules and blanket agreement price breaks. You need one row for each schedule or price break you attach to a document line. There are seven types of documents that use shipment schedules:
RFQs, Quotations, Standard purchase orders, planned purchase orders, planned purchase order releases, Blanket purchase orders, Blanket purchase order releases each row includes the location, quantity, and dates for each shipment schedule. Oracle Purchasing uses this information to record delivery schedule information for purchase orders, and price break information for blanket purchase orders, quotations and RFQs.
Forms Personalization
In this article, I would like to explain different possibilities of Forms Personalizations. Surely before explaining what can be done, first we will touch base upon what exactly it is.
Why was forms personalization introduced by Oracle in 11.5.10?
1. CUSTOM.pll is a programmatic methodology for extending Oracle Forms, even for trivial tasks.
2. Multiple developers working on same CUSTOM.pll could cause version related headaches
Does Forms Personalization replace CUSTOM.pll?
Not really, however it does provide an alternative to most common activities for which earlier one would use CUSTOM.pll
Forms personalization is driven by the same set of events as that for CUSTOM.pll.
Keep in mind that Oracle Forms Libraries first invoke the Forms Personalization, and then the CUSTOM.pll too for the same set of events.
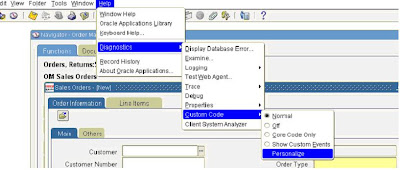
How do I enable Forms Personalizations?
Enable the personalizations using the Help/Diagnostics menu.
What are the various components of Forms Personalizations?Different components of Oracle Forms Personalizations are listed below. You begin with recognizing which Triggers/Events that you wish to trap and under what conditions. The condition can be entered using the syntax as defined in the picture below.
What does the Action Tab do?Here you will either change form property, or display messages or enable menu etc.
Can I modify SQL Query behind the LOV using Forms Personalizations?Of course you can. In the below example I am restricting the LOV to less than 3records by introducing where rownum <3
Can I call a PL/SQL Stored procedure passing it form field variables?Yes, using the syntax below.
Note: You can also invoke FORMS_DDL built-in to perform DDL.
Can I call BuiltIn's? Indeed, as shown below, you can pick from all the form built-in's as below.
What is forms Personalization?
Form personalization first and then only custom pll
Menu Navigation: Help ->Diagnostics->Custom Code -> Personalize
Utilities: Diagnostics = Yes/No
Hide Diagnostics = Yes/No


Why was forms personalization introduced by Oracle in 11.5.10?
1. CUSTOM.pll is a programmatic methodology for extending Oracle Forms, even for trivial tasks.
2. Multiple developers working on same CUSTOM.pll could cause version related headaches
Does Forms Personalization replace CUSTOM.pll?
Not really, however it does provide an alternative to most common activities for which earlier one would use CUSTOM.pll
Forms personalization is driven by the same set of events as that for CUSTOM.pll.
Keep in mind that Oracle Forms Libraries first invoke the Forms Personalization, and then the CUSTOM.pll too for the same set of events.
How do I enable Forms Personalizations?
Enable the personalizations using the Help/Diagnostics menu.
Note: You can also invoke FORMS_DDL built-in to perform DDL.
Can I call BuiltIn's? Indeed, as shown below, you can pick from all the form built-in's as below.
It is new features where some of the customization can be handled easy by simply setting the rules from the front end.It is available from 11.5.10.2
Why do we need forms Personalization?
For example in scenarios like
1.Change the prompts
2.Display some custom message when certain conditions are met
3.Enable and disabling fields/buttons based on conditions
4.For Enabling special menu.(like opening another reference form from the current form)
IF both Form personalization and custom pll are done for a form which one will take effect first?
How to start doing it?
Open the form where you want to personalize .
This should open the personalization Form.
There are two profile options which will decide whether you able to see or not
Profiles:
Hide Diagnostics = Yes/No

There is new option available for level to define whether the rule need to be applied at form level or function level.Because a form can be attached to multiple functions.

Insert Get Expression & Insert item value button help you in building the conditional statement , very help for non technical people.
The major thing to observe are
1.SEQ: The sequence in which the rules are executed
2.Description:Description of the Rule
3.Level -- whether it is at form level or Function level..
4.Condition –what is the event and the object where the below condition need to
be checked
5.Action-- what actions it should perform when the condition is met
6.Context -- same a profile option levels at what level the rule need to be applied

Under actions
SEQ: it gives the list of actions that need to be performed when the condition is met
Type:1.Property – used for changing the properties of field
Message –used to display message when the condition is met
Built in --used to calling some standard form and AOL functionalities
Menu -- used in case of enabling special menu’s
General & Important Observations:
All actions and rules can be enabled and disabled(using checkbox) or deleted using delete option on the tool bar
Always validate the rule after you create using validate button
Save the record before you close this personalization form
To move form personalization from one instance to other there is FNDLOAD utility available .
Check the site for FNDLOAD examples…
Standard Forms Customization(Part1--Custom PLL )
There are different ways to handle Forms Level Customizations.
1.Using Custom.PLL
2.Using Forms Personalizations
3.Copy the Standard form Object and Change the Code
First lets see Custom.pll how to use it?
What is Custom.PLL??
The CUSTOM.pll library is a standard Oracle Forms PL/SQL library that is supplied by Oracle with the Oracle
Applications. This is Oracle’s built-in feature that allows the customer to enhance the standard functionality of the
Applications by implementing site-specific business rules. Every Oracle Forms -based eBusiness screen, and any
custom form developed using the Oracle Application development standards, will access the CUSTOM library.
This makes an ideal point of creating business rules that effect the entire organization.
Where is this located?
Custom.pll is located in $AU_TOP/resource Directory.
How to add code to this ?
open this pll using the Form builder.make changes to the program units
How to compile this PLL ?
Once you make changes you need to compile the pll.use the F60gen to compile it
f60gen module=custom.pll userid=APPS/ output_file=$AU_TOP/resource/custom.plx module_type=library batch=no compile_all=special
What are Different Triggers that is supported?
WHEN-NEW-FORM-INSTANCE – initially entering a form
WHEN-NEW-BLOCK-INSTANCE – entering a zone (or block) within a form
WHEN-NEW-ITEM-INSTANCE – moving into a new field within the form
WHEN-NEW-RECORD-INSTANCE - creating a new record
WHEN-FORM-NAVIGATE – navigating thru a form using the mouse
WHEN-VALIDATE-RECORD – saving (committing) the information to the database
EXPORT – triggered by using the Export feature Some events are field specific
ZOOM – Pre -11 feature for moving to another form and querying up specific records
Some events are form specific
SPECIALn - (where n is a number between 1 and 45) used to generate entries in the ‘Special’ menu of the
tool bar and the code is triggered by selecting a menu choices from the ‘Special’ option on the toolbar
KEY-Fn – (where n is a number between 1 and 8) triggered by pressing the corresponding function key
Some events are application specific:
Application Object Library
WHEN-LOGIN-CHANGED – when a user logs on as a different user
WHEN-RESPONSIBILITY-CHANGED – when a user changes responsibilities
WHEN-PASSWORD-CHANGED – when a user changes their password
How to make changes get affected?
Once you make the changes compile the pll and generate the PLX
Since the CUSTOM library is loaded once for a given session, a user must log out of the
application and sign-on again before any changes will become apparent.
Examples--Metalink:
1. Sample code to make all the responsibilities read only for a specific user.
BEGIN
IF event_name = 'WHEN-NEW-FORM-INSTANCE' THEN
IF FND_PROFILE.VALUE('USER_NAME')='' THEN
BEGIN
COPY('Entering app_form.query_only_mode.','global.frd_debug');
COPY('YES', 'PARAMETER.QUERY_ONLY');
APP_MENU2.SET_PROP('FILE.SAVE', ENABLED,PROPERTY_OFF);
APP_MENU2.SET_PROP('FILE.ACCEPT', ENABLED,PROPERTY_OFF);
formname := NAME_IN('system.current_form');
blockname := GET_FORM_PROPERY(formname, FIRST_BLOCK);
WHILE (blockname is not null) LOOP
IF (GET_BLOCK_PROPERTY(blockname, BASE_TABLE) is not NULL) THEN
SET_BLOCK_PROPERTY(blockname, INSERT_ALLOWED, PROPERTY_FALSE);
SET_BLOCK_PROPERTY(blockname, UPDATE_ALLOWED, PROPERTY_FALSE);
SET_BLOCK_PROPERTY(blockname, DELETE_ALLOWED, PROPERTY_FALSE);
END IF;
blockname := GET_BLOCK_PROPERTY(blockname, NEXTBLOCK);
END LOOP;
END query_only_mode;
END;
2.How does one restrict or reduce the LOV?
"The customer LOV can be overriden using the when-new-item-instance or when-new-form-instance event at the form level through CUSTOM.pll."
You will need to write custom code using that specific event in the custom.pll
Some sample code if (event_name = 'WHEN-NEW-FORM-INSTANCE' and form_name = 'form name')then
r:=find_group('group name');
if not id_null(r) then
delete_group('group name');
end if;
v:='select colum1,column2
from table';
r:=create_group_from_query('group name',v);
set_lov_property('lov NAME',group_name,r);--lov
See that the column names should be same as the old query so that the mappings still holds good
3.How to make the attachment function in specific responsibilities to act as read-only mode so that users who log into these specific responsibilities can only view attachments, while for the rest of the responsibilities allow users to add, update and delete attachments?
// Source File Name: custom.pll
// Source File path: $AU_TOP/resource
form_name varchar2(30) := name_in('system.current_form');
block_name varchar2(30) := name_in('system.cursor_block');
begin
if (event_name = 'WHEN-NEW-FORM-INSTANCE') then
if (form_name = 'FNDATTCH') then
if (FND_GLOBAL.RESP_NAME Like '') then --
Set_item_Property( SEQ_NUM, ENABLED,PROPERTY_FALSE);
Set_item_Property( CATEGORY_DESCRIPTION, ENABLED,PROPERTY_FALSE);
Set_item_Property( DOCUMENT_DESCRIPTION, ENABLED,PROPERTY_FALSE);
Set_item_Property( DATATYPE_NAME, ENABLED,PROPERTY_FALSE);
Set_item_Property( FILE_NAME_DISPLAY, ENABLED,PROPERTY_FALSE);
end if;
end if;
end if;
4. How to make the customisation CustomPO Number not less than PO 4 digits in sales order form?
procedure event(event_name varchar2) is
form_name varchar2(30) := name_in('system.current_form');
block_name varchar2(30) := name_in('system.cursor_block');
item_name varchar2(30) := name_in('system.cursor_item');
Begin
if (form_name = 'OEXOEORD'and block_name = 'ORDER') then
if LENGTH(name_in('ORDER.CUST_PO_NUMBER')) > 3 then
fnd_message.set_name('FND','Cust PO Number should be less than 4 digits');
fnd_message.Error;
RAISE FORM_TRIGGER_FAILURE;
End if;
End if;
End Event;
1.Using Custom.PLL
2.Using Forms Personalizations
3.Copy the Standard form Object and Change the Code
First lets see Custom.pll how to use it?
What is Custom.PLL??
The CUSTOM.pll library is a standard Oracle Forms PL/SQL library that is supplied by Oracle with the Oracle
Applications. This is Oracle’s built-in feature that allows the customer to enhance the standard functionality of the
Applications by implementing site-specific business rules. Every Oracle Forms -based eBusiness screen, and any
custom form developed using the Oracle Application development standards, will access the CUSTOM library.
This makes an ideal point of creating business rules that effect the entire organization.
Where is this located?
Custom.pll is located in $AU_TOP/resource Directory.
How to add code to this ?
open this pll using the Form builder.make changes to the program units
How to compile this PLL ?
Once you make changes you need to compile the pll.use the F60gen to compile it
f60gen module=custom.pll userid=APPS/
What are Different Triggers that is supported?
WHEN-NEW-FORM-INSTANCE – initially entering a form
WHEN-NEW-BLOCK-INSTANCE – entering a zone (or block) within a form
WHEN-NEW-ITEM-INSTANCE – moving into a new field within the form
WHEN-NEW-RECORD-INSTANCE - creating a new record
WHEN-FORM-NAVIGATE – navigating thru a form using the mouse
WHEN-VALIDATE-RECORD – saving (committing) the information to the database
EXPORT – triggered by using the Export feature Some events are field specific
ZOOM – Pre -11 feature for moving to another form and querying up specific records
Some events are form specific
SPECIALn - (where n is a number between 1 and 45) used to generate entries in the ‘Special’ menu of the
tool bar and the code is triggered by selecting a menu choices from the ‘Special’ option on the toolbar
KEY-Fn – (where n is a number between 1 and 8) triggered by pressing the corresponding function key
Some events are application specific:
Application Object Library
WHEN-LOGIN-CHANGED – when a user logs on as a different user
WHEN-RESPONSIBILITY-CHANGED – when a user changes responsibilities
WHEN-PASSWORD-CHANGED – when a user changes their password
How to make changes get affected?
Once you make the changes compile the pll and generate the PLX
Since the CUSTOM library is loaded once for a given session, a user must log out of the
application and sign-on again before any changes will become apparent.
Examples--Metalink:
1. Sample code to make all the responsibilities read only for a specific user.
BEGIN
IF event_name = 'WHEN-NEW-FORM-INSTANCE' THEN
IF FND_PROFILE.VALUE('USER_NAME')='
BEGIN
COPY('Entering app_form.query_only_mode.','global.frd_debug');
COPY('YES', 'PARAMETER.QUERY_ONLY');
APP_MENU2.SET_PROP('FILE.SAVE', ENABLED,PROPERTY_OFF);
APP_MENU2.SET_PROP('FILE.ACCEPT', ENABLED,PROPERTY_OFF);
formname := NAME_IN('system.current_form');
blockname := GET_FORM_PROPERY(formname, FIRST_BLOCK);
WHILE (blockname is not null) LOOP
IF (GET_BLOCK_PROPERTY(blockname, BASE_TABLE) is not NULL) THEN
SET_BLOCK_PROPERTY(blockname, INSERT_ALLOWED, PROPERTY_FALSE);
SET_BLOCK_PROPERTY(blockname, UPDATE_ALLOWED, PROPERTY_FALSE);
SET_BLOCK_PROPERTY(blockname, DELETE_ALLOWED, PROPERTY_FALSE);
END IF;
blockname := GET_BLOCK_PROPERTY(blockname, NEXTBLOCK);
END LOOP;
END query_only_mode;
END;
2.How does one restrict or reduce the LOV?
"The customer LOV can be overriden using the when-new-item-instance or when-new-form-instance event at the form level through CUSTOM.pll."
You will need to write custom code using that specific event in the custom.pll
Some sample code
r:=find_group('group name');
if not id_null(r) then
delete_group('group name');
end if;
v:='select colum1,column2
from table';
r:=create_group_from_query('group name',v);
set_lov_property('lov NAME',group_name,r);--lov
See that the column names should be same as the old query so that the mappings still holds good
3.How to make the attachment function in specific responsibilities to act as read-only mode so that users who log into these specific responsibilities can only view attachments, while for the rest of the responsibilities allow users to add, update and delete attachments?
// Source File Name: custom.pll
// Source File path: $AU_TOP/resource
form_name varchar2(30) := name_in('system.current_form');
block_name varchar2(30) := name_in('system.cursor_block');
begin
if (event_name = 'WHEN-NEW-FORM-INSTANCE') then
if (form_name = 'FNDATTCH') then
if (FND_GLOBAL.RESP_NAME Like '
Set_item_Property( SEQ_NUM, ENABLED,PROPERTY_FALSE);
Set_item_Property( CATEGORY_DESCRIPTION, ENABLED,PROPERTY_FALSE);
Set_item_Property( DOCUMENT_DESCRIPTION, ENABLED,PROPERTY_FALSE);
Set_item_Property( DATATYPE_NAME, ENABLED,PROPERTY_FALSE);
Set_item_Property( FILE_NAME_DISPLAY, ENABLED,PROPERTY_FALSE);
end if;
end if;
end if;
4. How to make the customisation CustomPO Number not less than PO 4 digits in sales order form?
procedure event(event_name varchar2) is
form_name varchar2(30) := name_in('system.current_form');
block_name varchar2(30) := name_in('system.cursor_block');
item_name varchar2(30) := name_in('system.cursor_item');
Begin
if (form_name = 'OEXOEORD'and block_name = 'ORDER') then
if LENGTH(name_in('ORDER.CUST_PO_NUMBER')) > 3 then
fnd_message.set_name('FND','Cust PO Number should be less than 4 digits');
fnd_message.Error;
RAISE FORM_TRIGGER_FAILURE;
End if;
End if;
End Event;
Subscribe to:
Posts (Atom)