Thursday, December 15, 2011

Order to Cash cycle

In this article, we will go through the Order to Cash cycle. The below are the steps in short:

  • Enter the Sales Order
  • Book the Sales Order
  • Launch Pick Release
  • Ship Confirm
  • Create Invoice
  • Create the Receipts either manually or using Auto Lockbox ( In this article we will concentrate on Manual creation)
  • Transfer to General Ledger
  • Journal Import
  • Posting
Let’s get into the details of each step mentioned above.

Enter the Sales Order:

Navigation:
Order Management Super User Operations (USA)>Orders Returns >Sales Orders

Enter the Customer details (Ship to and Bill to address), Order type.


Click on Lines Tab. Enter the Item to be ordered and the quantity required.


Line is scheduled automatically when the Line Item is saved.
Scheduling/unscheduling can be done manually by selecting Schedule/Un schedule from the Actions Menu.

You can check if the item to be ordered is available in the Inventory by clicking on Availability Button.


Save the work.

Underlying Tables affected:

In Oracle, Order information is maintained at the header and line level.
The header information is stored in OE_ORDER_HEADERS_ALL and the line information in OE_ORDER_LINES_ALL when the order is entered. The column called FLOW_STATUS_CODE is available in both the headers and lines tables which tell us the status of the order at each stage.

At this stage, the FLOW_STATUS_CODE in OE_ORDER_HEADERS_ALL is ‘Entered’


Book the Sales Order:

Book the Order by clicking on the Book Order button.


Now that the Order is BOOKED, the status on the header is change accordingly.


Underlying tables affected:

At this stage:
The FLOW_STATUS_CODE in the table OE_ORDER_HEADERS_ALL would be
‘BOOKED’
The FLOW_STATUS_CODE in OE_ORDER_LINES_ALL will be
‘AWAITING_SHIPPING’.
Record(s) will be created in the table WSH_DELIVERY_DETAILS with
RELEASED_STATUS=’R’ (Ready to Release)
Also Record(s) will be inserted into WSH_DELIVERY_ASSIGNMENTS.
At the same time DEMAND INTERFACE PROGRAM runs in the background and inserts
into MTL_DEMAND


Launch Pick Release:
Navigation:
Shipping > Release Sales Order > Release Sales Orders.

Key in Based on Rule and Order Number


In the Shipping Tab key in the below:
Auto Create Delivery: Yes
Auto Pick Confirm: Yes
Auto Pack Delivery: Yes


In the Inventory Tab:
Auto Allocate: Yes
Enter the Warehouse


Click on Execute Now Button.
On successful completion, the below message would pop up as shown below.


Pick Release process in turn will kick off several other requests like Pick Slip Report,
Shipping Exception Report and Auto Pack Report


Underlying Tables affected:
If Autocreate Delivery is set to ‘Yes’ then a new record is created in the table WSH_NEW_DELIVERIES.
DELIVERY_ID is populated in the table WSH_DELIVERY_ASSIGNMENTS.
The RELEASED_STATUS in WSH_DELIVERY_DETAILS would be now set to ‘Y’ (Pick Confirmed) if Auto Pick Confirm is set to Yes otherwise RELEASED_STATUS is ‘S’ (Release to Warehouse).

Pick Confirm the Order:
IF Auto Pick Confirm in the above step is set to NO, then the following should be done.
Navigation:
Inventory Super User > Move Order> Transact Move Order

In the HEADER tab, enter the BATCH NUMBER (from the above step) of the order. Click FIND. Click on VIEW/UPDATE Allocation, then Click TRANSACT button. Then Transact button will be deactivated then just close it and go to next step.


Ship Confirm the Order:

Navigation:

Order Management Super User>Shipping >Transactions.

Query with the Order Number.


Click On Delivery Tab


Click on Ship Confirm.


The Status in Shipping Transaction screen will now be closed.


This will kick off concurrent programs like.INTERFACE TRIP Stop, Commercial Invoice, Packing Slip Report, Bill of Lading

Underlying tables affected:

RELEASED_STATUS in WSH_DELIVERY_DETAILS would be ‘C’ (Ship Confirmed)
FLOW_STATUS_CODE in OE_ORDER_HEADERS_ALL would be “BOOKED“
FLOW_STATUS_CODE in OE_ORDER_LINES_ALL would be “SHIPPED“


Create Invoice:

Run workflow background Process.

Navigation:
Order Management >view >Requests


Workflow Background Process inserts the records RA_INTERFACE_LINES_ALL with

INTERFACE_LINE_CONTEXT     =     ’ORDER ENTRY’
INTERFACE_LINE_ATTRIBUTE1=     Order_number
INTERFACE_LINE_ATTRIBUTE3=     Delivery_id


and spawns Auto invoice Master Program and Auto invoice import program which creates Invoice for that particular Order.


The Invoice created can be seen using the Receivables responsibility
Navigation:
Receivables Super User> Transactions> Transactions

Query with the Order Number as Reference.


Underlying tables:
RA_CUSTOMER_TRX_ALL will have the Invoice header information. The column INTERFACE_HEADER_ATTRIBUTE1 will have the Order Number.

RA_CUSTOMER_TRX_LINES_ALL will have the Invoice lines information. The column INTERFACE_LINE_ATTRIBUTE1 will have the Order Number.

Create receipt:
Navigation:
Receivables> Receipts> Receipts

Enter the information.

Click on Apply Button to apply it to the Invoice.


Underlying tables:
AR_CASH_RECEIPTS_ALL


Transfer to General Ledger:
To transfer the Receivables accounting information to general ledger, run General Ledger Transfer Program.

Navigation:
Receivables> View Requests

Parameters:

  • Give in the Start date and Post through date to specify the date range of the transactions to be transferred.
  • Specify the GL Posted Date, defaults to SYSDATE.
  • Post in summary: This controls how Receivables creates journal entries for your transactions in the interface table. If you select ‘No’, then the General Ledger Interface program creates at least one journal entry in the interface table for each transaction in your posting submission. If you select ‘Yes’, then the program creates one journal entry for each general ledger account.
  • If the Parameter Run Journal Import is set to ‘Yes’, the journal import program is kicked off automatically which transfers journal entries from the interface table to General Ledger, otherwise follow the topic Journal Import to import the journals to General Ledger manually.


.

Underlying tables:

This transfers data about your adjustments, chargeback, credit memos, commitments, debit memos, invoices, and receipts to the GL_INTERFACE table.


Journal Import:

To transfer the data from General Ledger Interface table to General Ledger, run the Journal Import program from Oracle General Ledger.


Navigation:
General Ledger > Journal> Import> Run

Parameters:
  • Select the appropriate Source.
  • Enter one of the following Selection Criteria:
    No Group ID: To import all data for that source that has no group ID. Use this option if you specified a NULL group ID for this source.
    All Group IDs: To import all data for that source that has a group ID. Use this option to import multiple journal batches for the same source with varying group IDs.
    Specific Group ID: To import data for a specific source/group ID combination. Choose a specific group ID from the List of Values for the Specific Value field.
    If you do not specify a Group ID, General Ledger imports all data from the specified journal entry source, where the Group_ID is null.
  • Define the Journal Import Run Options (optional)
    Choose Post Errors to Suspense if you have suspense posting enabled for your set of books to post the difference resulting from any unbalanced journals to your suspense account.
    Choose Create Summary Journals to have journal import create the following:
    • one journal line for all transactions that share the same account, period, and currency and that has a debit balance
    • one journal line for all transactions that share the same account, period, and currency and that has a credit balance.
  • Enter a Date Range to have General Ledger import only journals with accounting dates in that range. If you do not specify a date range, General Ledger imports all journals data.
  • Choose whether to Import Descriptive Flexfields, and whether to import them with validation.

Click on Import button.


Underlying tables:

GL_JE_BATCHES, GL_JE_HEADERS, GL_JE_LINES


Posting:

We have to Post journal batches that we have imported previously to update the account balances in General Ledger.

Navigation:

General Ledger> Journals > Enter

Query for the unposted journals for a specific period as shown below.


From the list of unposted journals displayed, select one journal at a time and click on Post button to post the journal.


If you know the batch name to be posted you can directly post using the Post window

Navigation:
General Ledger> Journals> Post


Underlying tables:

GL_BALANCES.

What are Profile Options in Oracle Apps ?

Profile Options provide flexibility to Oracle Apps. They are a key component of Oracle Applications, hence these much be understood properly. I will be taking multiple examples here to explain what profile options mean. I will also try to explain by stepping into Oracle shoes "How will you design a program that is flexible", by using Profile Options.

Following that, if you still have questions regarding profile options, then leave a comment and I promise to respond. For the learners of Oracle Apps, understanding profile options is mandatory.

What is profile option?
The profile option acts like a Global Variable in Oracle.

Why does Oracle provide profile options?
These are provided to keep the application flexible. The business rules in various countries and various companies can be different. Hence the profile options are delivered by Oracle in such a manner to avoid hard-coding of logic, and to let the implementation team at site decide the values of those variables.

For screenshots of below listed examples in this article, please check below screen shots..

Enough definitions, give me some scenarios where profile options are used by Oracle....
1. There are profile options which can turn the debugging on, to generate debug messages. Say one of 1000 users reports a problem, and hence you wish to enable debugging against just that specific user. In this case you can “Turn On” the debugging profile option "again that specific user".
2. There are profile options that control which user can give discount to their customers at the time of data entry. You can set profile option "Discount Allowed" to a value of either Yes or No against each Order Entry user.
3. Lets assume an Organization has department D1 and D2. Managers of both the Departments have "HRMS Employee View" responsibility. But you do not want Manager of D2 to be able to see the list of Employees in Organization D1. Hence you can set a profile option against the username of each of these users. The value assigned to such profile option will be "Name of the Organization" for which they can see the employees. Of course, the SQL in screen that displays list of employees will filter off the data based on “logged in users profile option value”.


Let’s take an example. Let’s assume you are a developer in Oracle Corporation building a screen in ERP. Let us further assume that you are developing an Order Entry screen.
Assume that business requirements for your development work is:-
1. Screen should be flexible to ensure that different users of the screen can give different levels of discounts. For example, a clerk Order Entry User can give no more than 5% discount. But Sales Manager can enter an Order with 15% discount.
2. There should not be any hard-coding regarding the maximum permissible discount.
3. In the screen there will be a discount field.
4. When the discount value is entered in discount field, an error will be raised if user violates the maximum permissible discount.

Here is how Oracle will code this screen
1. They will define a profile option named "OEPASSI Maximum Discount Allowed".
2. The short name of this profile option is "OEPASSI_MAX_DISCOUNT"
2. In the when-validate-item of the discount field(assuming Oracle Forms), following code will be written
IF :oe_line_block.discount_value > fnd_profile.value('OEPASSI_MAX_DISCOUNT') 
THEN
message( 
'You can’t give discount more than ' 
|| fnd_profile.value('OEPASSI_MAX_DISCOUNT') || '%' ) ;
raise form_trigger_failure ;-- I mean raise error after showing message
END IF ;

Here is how, the client implementing Oracle Order Entry will configure their system.
1. Navigate to System administration and click on system profile menu.
2. For Clerk User(JOHN), set value of profile "OEPASSI Maximum Discount Allowed" to 5
For Sales Manager User(SMITH), set value of profile "OEPASSI Maximum Discount Allowed" to 15


Question: This sounds good, but what if you have 500 Order Entry Clerks and 100 Order Entry Sales Managers? Do we have to assign profile option values to each 600 users?
Answer : Well, in this case, each Clerk will be assigned Responsibility named say “XX Order Entry Clerk Responsibility”
Each Sales Manager will be assigned Responsibility named say “XX Order Entry Sales Manager Responsibility”
In this case, you can assign a profile option value to both these responsibilities.
“XX Order Entry Clerk Responsibility” will have a value 5% assigned against it. However, “XX Order Entry Sales Manager Responsibility” will have a profile option value of 15% assigned.
In the when-validate-item of the discount field, following code will then be written
IF :oe_line_block.discount_value > fnd_profile.value('OEPASSI_MAX_DISCOUNT') 
THEN
message( 
'You can’t give discount more than ' 
|| fnd_profile.value('OEPASSI_MAX_DISCOUNT') || '%' ) ;
raise form_trigger_failure ;-- I mean raise error after showing message
END IF ;

Please note that our coding style does not change even though the profile option is now being assigned against responsibility. The reason is that API fnd_profile.value will follow logic similar to below.
Does Profile option value exist against User?
--Yes: Use the profile option value defined against the user.
--No: Does Profile option value exist against Responsibility
-----Yes: Use the profile option value defined against the current responsibility in which user has logged into.
-----No: Use the profile option value defined against Site level.

Profile Options Examples Screenshots


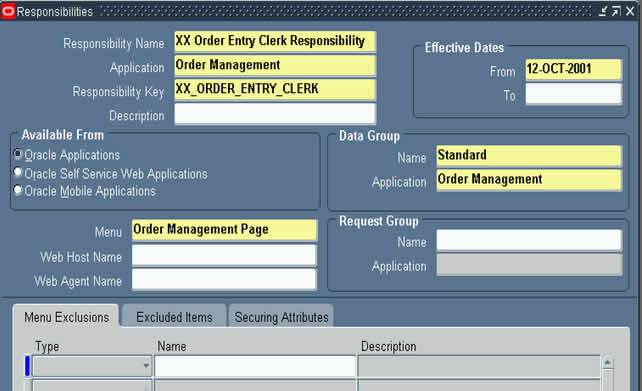
Firstly, lets define the responsibility for Clerk, as we discussed in Article.

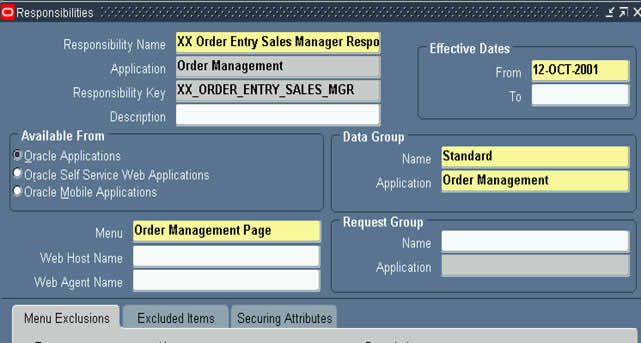
Next, lets define the sales manager responsibility, as we discussed in Article.


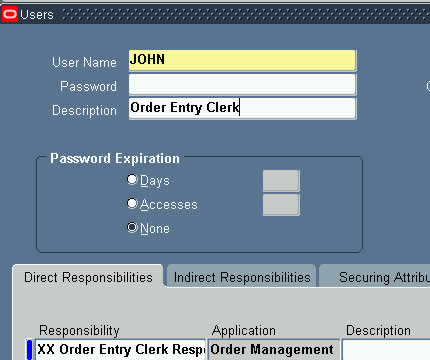
Lets define user JOHN, that is Clerk


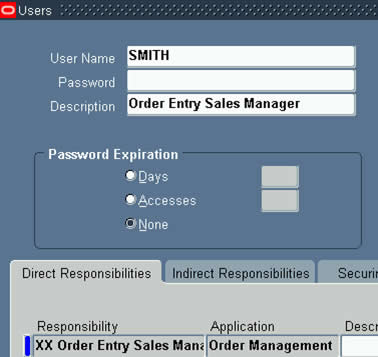
And also, lets define user SMITH ( Sales manager )

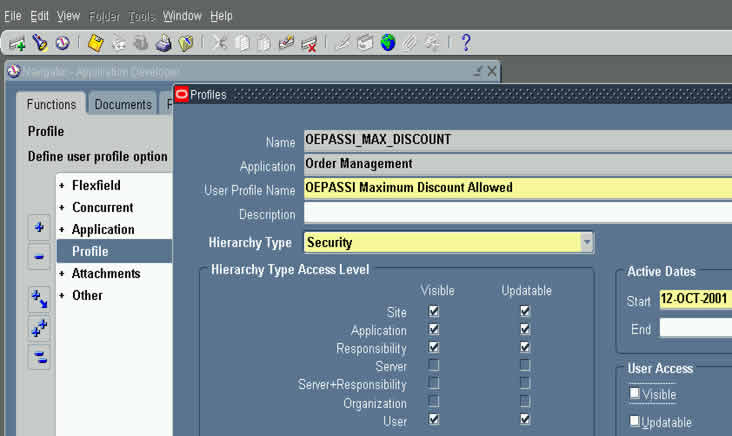
Now, we need to define the profile option for discount, hence go to responsibility "Application Developer"

When you click on menu "Profile" above, you will then see below screen for defining profile option. Please note that the "Name" field is the short name of profile option, and it is this name used in API call to FND_PROFILE.value


Now, after having defined a profile option, its time to assign these to JOHN & SMITH.
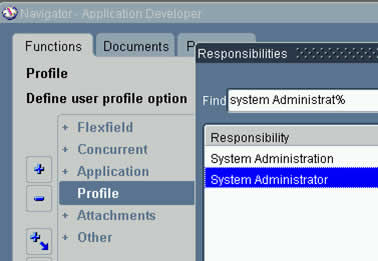
Hence go to responsibility "System Administrator"


Click on Menu Profile/System, as below

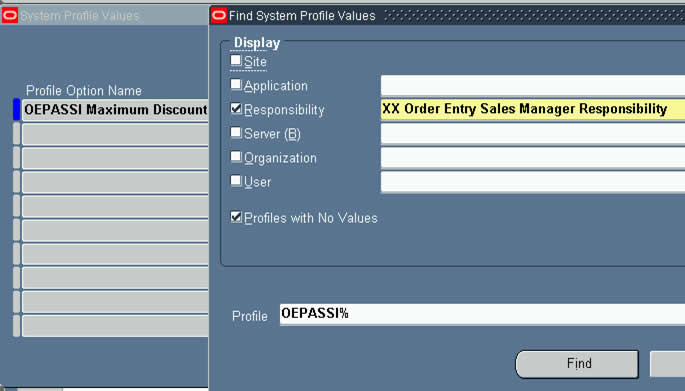
The profile option assignment screen looks like below. Enter JOHN in USER, OEPASSI% in Profile, to select profile named "OEPASSI Maximum Discount Allowed"

Assign a value of 5 to the user.


Click on torch, to return to search screen as below


and this time we will assign value of 15 against user SMITH.

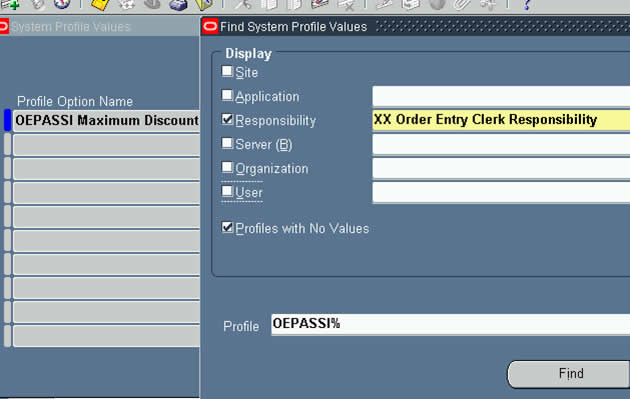
OK, what if we have too many clerks, we can also simply assign profile value to Responsibility of Clerk. Doing so, all the users that use this responsibility, will inherit profile option value against Responsibility.


Assign 5% max discount for Clerks

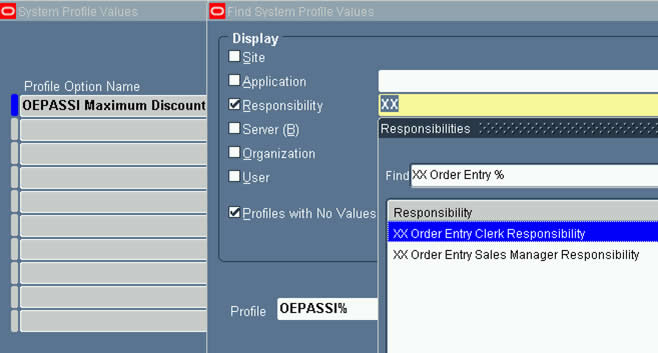
Now, lets select Sales Manager responsibility in profile screen

Search on this...as below......

Assign value 15% to Sales Manager responsibility.

Email From Oracle PL/SQL (UTL_SMTP)

PROCEDURE send_mail (p_to        IN VARCHAR2,
                                       p_from      IN VARCHAR2,
                                       p_message   IN VARCHAR2,
                                       p_smtp_host IN VARCHAR2,
                                       p_smtp_port IN NUMBER DEFAULT 25)
AS
  l_mail_conn   UTL_SMTP.connection;
BEGIN
  l_mail_conn := UTL_SMTP.open_connection(p_smtp_host, p_smtp_port);
  UTL_SMTP.helo(l_mail_conn, p_smtp_host);
  UTL_SMTP.mail(l_mail_conn, p_from);
  UTL_SMTP.rcpt(l_mail_conn, p_to);
  UTL_SMTP.data(l_mail_conn, p_message || UTL_TCP.crlf || UTL_TCP.crlf);
  UTL_SMTP.quit(l_mail_conn);
END;
/
The code below shows how the procedure is called.
BEGIN
  send_mail(p_to        => 'me@mycompany.com',
            p_from      => 'admin@mycompany.com',
            p_message   => 'This is a test message.',
            p_smtp_host => 'smtp.mycompany.com');
END;
/

Multi-Line Emails

Multi-line messages can be written by expanding the UTL_SMTP.DATA command using the UTL_SMTP.WRITE_DATA command as follows. This is a better method to use as the total message size is no longer constrained by the 32K limit on a VARCHAR2variable. In the following example the header information has been included in the message also.
CREATE OR REPLACE PROCEDURE send_mail (p_to        IN VARCHAR2,
                                       p_from      IN VARCHAR2,
                                       p_subject   IN VARCHAR2,
                                       p_message   IN VARCHAR2,
                                       p_smtp_host IN VARCHAR2,
                                       p_smtp_port IN NUMBER DEFAULT 25)
AS
  l_mail_conn   UTL_SMTP.connection;
BEGIN
  l_mail_conn := UTL_SMTP.open_connection(p_smtp_host, p_smtp_port);
  UTL_SMTP.helo(l_mail_conn, p_smtp_host);
  UTL_SMTP.mail(l_mail_conn, p_from);
  UTL_SMTP.rcpt(l_mail_conn, p_to);

  UTL_SMTP.open_data(l_mail_conn);
  
  UTL_SMTP.write_data(l_mail_conn, 'Date: ' || TO_CHAR(SYSDATE, 'DD-MON-YYYY HH24:MI:SS') || UTL_TCP.crlf);
  UTL_SMTP.write_data(l_mail_conn, 'To: ' || p_to || UTL_TCP.crlf);
  UTL_SMTP.write_data(l_mail_conn, 'From: ' || p_from || UTL_TCP.crlf);
  UTL_SMTP.write_data(l_mail_conn, 'Subject: ' || p_subject || UTL_TCP.crlf);
  UTL_SMTP.write_data(l_mail_conn, 'Reply-To: ' || p_from || UTL_TCP.crlf || UTL_TCP.crlf);
  
  UTL_SMTP.write_data(l_mail_conn, p_message || UTL_TCP.crlf || UTL_TCP.crlf);
  UTL_SMTP.close_data(l_mail_conn);

  UTL_SMTP.quit(l_mail_conn);
END;
/
The code below shows how the procedure is called.
BEGIN
  send_mail(p_to        => 'me@mycompany.com',
            p_from      => 'admin@mycompany.com',
            p_subject   => 'Test Message',
            p_message   => 'This is a test message.',
            p_smtp_host => 'smtp.mycompany.com');
END;
/

HTML Emails

The following procedure builds on the previous version, allowing it include plain text and/or HTML versions of the email. The format of the message is explained here.
CREATE OR REPLACE PROCEDURE send_mail (p_to        IN VARCHAR2,
                                       p_from      IN VARCHAR2,
                                       p_subject   IN VARCHAR2,
                                       p_text_msg  IN VARCHAR2 DEFAULT NULL,
                                       p_html_msg  IN VARCHAR2 DEFAULT NULL,
                                       p_smtp_host IN VARCHAR2,
                                       p_smtp_port IN NUMBER DEFAULT 25)
AS
  l_mail_conn   UTL_SMTP.connection;
  l_boundary    VARCHAR2(50) := '----=*#abc1234321cba#*=';
BEGIN
  l_mail_conn := UTL_SMTP.open_connection(p_smtp_host, p_smtp_port);
  UTL_SMTP.helo(l_mail_conn, p_smtp_host);
  UTL_SMTP.mail(l_mail_conn, p_from);
  UTL_SMTP.rcpt(l_mail_conn, p_to);

  UTL_SMTP.open_data(l_mail_conn);
  
  UTL_SMTP.write_data(l_mail_conn, 'Date: ' || TO_CHAR(SYSDATE, 'DD-MON-YYYY HH24:MI:SS') || UTL_TCP.crlf);
  UTL_SMTP.write_data(l_mail_conn, 'To: ' || p_to || UTL_TCP.crlf);
  UTL_SMTP.write_data(l_mail_conn, 'From: ' || p_from || UTL_TCP.crlf);
  UTL_SMTP.write_data(l_mail_conn, 'Subject: ' || p_subject || UTL_TCP.crlf);
  UTL_SMTP.write_data(l_mail_conn, 'Reply-To: ' || p_from || UTL_TCP.crlf);
  UTL_SMTP.write_data(l_mail_conn, 'MIME-Version: 1.0' || UTL_TCP.crlf);
  UTL_SMTP.write_data(l_mail_conn, 'Content-Type: multipart/alternative; boundary="' || l_boundary || '"' || UTL_TCP.crlf || UTL_TCP.crlf);
  
  IF p_text_msg IS NOT NULL THEN
    UTL_SMTP.write_data(l_mail_conn, '--' || l_boundary || UTL_TCP.crlf);
    UTL_SMTP.write_data(l_mail_conn, 'Content-Type: text/plain; charset="iso-8859-1"' || UTL_TCP.crlf || UTL_TCP.crlf);

    UTL_SMTP.write_data(l_mail_conn, p_text_msg);
    UTL_SMTP.write_data(l_mail_conn, UTL_TCP.crlf || UTL_TCP.crlf);
  END IF;

  IF p_html_msg IS NOT NULL THEN
    UTL_SMTP.write_data(l_mail_conn, '--' || l_boundary || UTL_TCP.crlf);
    UTL_SMTP.write_data(l_mail_conn, 'Content-Type: text/html; charset="iso-8859-1"' || UTL_TCP.crlf || UTL_TCP.crlf);

    UTL_SMTP.write_data(l_mail_conn, p_html_msg);
    UTL_SMTP.write_data(l_mail_conn, UTL_TCP.crlf || UTL_TCP.crlf);
  END IF;

  UTL_SMTP.write_data(l_mail_conn, '--' || l_boundary || '--' || UTL_TCP.crlf);
  UTL_SMTP.close_data(l_mail_conn);

  UTL_SMTP.quit(l_mail_conn);
END;
/
The code below shows how the procedure is called.
DECLARE
  l_html VARCHAR2(32767);
BEGIN
  l_html := '<html>
    <head>
      <title>Test HTML message</title>
    </head>
    <body>
      <p>This is a <b>HTML</b> <i>version</i> of the test message.</p>
      <p><img src="http://www.oracle-base.com/images/site_logo.gif" alt="Site Logo" />
    </body>
  </html>';

  send_mail(p_to        => 'me@mycompany.com',
            p_from      => 'admin@mycompany.com',
            p_subject   => 'Test Message',
            p_text_msg  => 'This is a test message.',
            p_html_msg  => l_html,
            p_smtp_host => 'smtp.mycompany.com');
END;
/

Emails with Attachments

Sending an email with an attachment is similar to the previous example as the message and the attachment must be separated by a boundary and identified by a name and mime type.

BLOB Attachment

Attaching a BLOB requires the binary data to be encoded and converted to text so it can be sent using SMTP.
CREATE OR REPLACE PROCEDURE send_mail (p_to          IN VARCHAR2,
                                       p_from        IN VARCHAR2,
                                       p_subject     IN VARCHAR2,
                                       p_text_msg    IN VARCHAR2 DEFAULT NULL,
                                       p_attach_name IN VARCHAR2 DEFAULT NULL,
                                       p_attach_mime IN VARCHAR2 DEFAULT NULL,
                                       p_attach_blob IN BLOB DEFAULT NULL,
                                       p_smtp_host   IN VARCHAR2,
                                       p_smtp_port   IN NUMBER DEFAULT 25)
AS
  l_mail_conn   UTL_SMTP.connection;
  l_boundary    VARCHAR2(50) := '----=*#abc1234321cba#*=';
  l_step        PLS_INTEGER  := 24573;
BEGIN
  l_mail_conn := UTL_SMTP.open_connection(p_smtp_host, p_smtp_port);
  UTL_SMTP.helo(l_mail_conn, p_smtp_host);
  UTL_SMTP.mail(l_mail_conn, p_from);
  UTL_SMTP.rcpt(l_mail_conn, p_to);

  UTL_SMTP.open_data(l_mail_conn);
  
  UTL_SMTP.write_data(l_mail_conn, 'Date: ' || TO_CHAR(SYSDATE, 'DD-MON-YYYY HH24:MI:SS') || UTL_TCP.crlf);
  UTL_SMTP.write_data(l_mail_conn, 'To: ' || p_to || UTL_TCP.crlf);
  UTL_SMTP.write_data(l_mail_conn, 'From: ' || p_from || UTL_TCP.crlf);
  UTL_SMTP.write_data(l_mail_conn, 'Subject: ' || p_subject || UTL_TCP.crlf);
  UTL_SMTP.write_data(l_mail_conn, 'Reply-To: ' || p_from || UTL_TCP.crlf);
  UTL_SMTP.write_data(l_mail_conn, 'MIME-Version: 1.0' || UTL_TCP.crlf);
  UTL_SMTP.write_data(l_mail_conn, 'Content-Type: multipart/mixed; boundary="' || l_boundary || '"' || UTL_TCP.crlf || UTL_TCP.crlf);
  
  IF p_text_msg IS NOT NULL THEN
    UTL_SMTP.write_data(l_mail_conn, '--' || l_boundary || UTL_TCP.crlf);
    UTL_SMTP.write_data(l_mail_conn, 'Content-Type: text/plain; charset="iso-8859-1"' || UTL_TCP.crlf || UTL_TCP.crlf);

    UTL_SMTP.write_data(l_mail_conn, p_text_msg);
    UTL_SMTP.write_data(l_mail_conn, UTL_TCP.crlf || UTL_TCP.crlf);
  END IF;

  IF p_attach_name IS NOT NULL THEN
    UTL_SMTP.write_data(l_mail_conn, '--' || l_boundary || UTL_TCP.crlf);
    UTL_SMTP.write_data(l_mail_conn, 'Content-Type: ' || p_attach_mime || '; name="' || p_attach_name || '"' || UTL_TCP.crlf);
    UTL_SMTP.write_data(l_mail_conn, 'Content-Transfer-Encoding: base64' || UTL_TCP.crlf);
    UTL_SMTP.write_data(l_mail_conn, 'Content-Disposition: attachment; filename="' || p_attach_name || '"' || UTL_TCP.crlf || UTL_TCP.crlf);

    FOR i IN 0 .. TRUNC((DBMS_LOB.getlength(p_attach_blob) - 1 )/l_step) LOOP
      UTL_SMTP.write_data(l_mail_conn, UTL_RAW.cast_to_varchar2(UTL_ENCODE.base64_encode(DBMS_LOB.substr(p_attach_blob, l_step, i * l_step + 1))));
    END LOOP;

    UTL_SMTP.write_data(l_mail_conn, UTL_TCP.crlf || UTL_TCP.crlf);
  END IF;
  
  UTL_SMTP.write_data(l_mail_conn, '--' || l_boundary || '--' || UTL_TCP.crlf);
  UTL_SMTP.close_data(l_mail_conn);

  UTL_SMTP.quit(l_mail_conn);
END;
/
The code below shows how the procedure is called.
DECLARE
  l_name images.name%TYPE := 'site_logo.gif';
  l_blob images.image%TYPE;
BEGIN
  SELECT image
  INTO   l_blob
  FROM   images
  WHERE  name = l_name;
  
  send_mail(p_to          => 'me@mycompany.com',
            p_from        => 'admin@mycompany.com',
            p_subject     => 'Test Message',
            p_text_msg    => 'This is a test message.',
            p_attach_name => 'site_logo.gif',
            p_attach_mime => 'image/gif',
            p_attach_blob => l_blob,
            p_smtp_host   => 'smtp.mycompany.com');
END;
/

CLOB Attachment

Attaching a CLOB is similar to attaching a BLOB, but we don't have to worry about encoding the data because it is already plain text.
CREATE OR REPLACE PROCEDURE send_mail (p_to          IN VARCHAR2,
                                       p_from        IN VARCHAR2,
                                       p_subject     IN VARCHAR2,
                                       p_text_msg    IN VARCHAR2 DEFAULT NULL,
                                       p_attach_name IN VARCHAR2 DEFAULT NULL,
                                       p_attach_mime IN VARCHAR2 DEFAULT NULL,
                                       p_attach_clob IN CLOB DEFAULT NULL,
                                       p_smtp_host   IN VARCHAR2,
                                       p_smtp_port   IN NUMBER DEFAULT 25)
AS
  l_mail_conn   UTL_SMTP.connection;
  l_boundary    VARCHAR2(50) := '----=*#abc1234321cba#*=';
  l_step        PLS_INTEGER  := 24573;
BEGIN
  l_mail_conn := UTL_SMTP.open_connection(p_smtp_host, p_smtp_port);
  UTL_SMTP.helo(l_mail_conn, p_smtp_host);
  UTL_SMTP.mail(l_mail_conn, p_from);
  UTL_SMTP.rcpt(l_mail_conn, p_to);

  UTL_SMTP.open_data(l_mail_conn);
  
  UTL_SMTP.write_data(l_mail_conn, 'Date: ' || TO_CHAR(SYSDATE, 'DD-MON-YYYY HH24:MI:SS') || UTL_TCP.crlf);
  UTL_SMTP.write_data(l_mail_conn, 'To: ' || p_to || UTL_TCP.crlf);
  UTL_SMTP.write_data(l_mail_conn, 'From: ' || p_from || UTL_TCP.crlf);
  UTL_SMTP.write_data(l_mail_conn, 'Subject: ' || p_subject || UTL_TCP.crlf);
  UTL_SMTP.write_data(l_mail_conn, 'Reply-To: ' || p_from || UTL_TCP.crlf);
  UTL_SMTP.write_data(l_mail_conn, 'MIME-Version: 1.0' || UTL_TCP.crlf);
  UTL_SMTP.write_data(l_mail_conn, 'Content-Type: multipart/mixed; boundary="' || l_boundary || '"' || UTL_TCP.crlf || UTL_TCP.crlf);
  
  IF p_text_msg IS NOT NULL THEN
    UTL_SMTP.write_data(l_mail_conn, '--' || l_boundary || UTL_TCP.crlf);
    UTL_SMTP.write_data(l_mail_conn, 'Content-Type: text/plain; charset="iso-8859-1"' || UTL_TCP.crlf || UTL_TCP.crlf);

    UTL_SMTP.write_data(l_mail_conn, p_text_msg);
    UTL_SMTP.write_data(l_mail_conn, UTL_TCP.crlf || UTL_TCP.crlf);
  END IF;

  IF p_attach_name IS NOT NULL THEN
    UTL_SMTP.write_data(l_mail_conn, '--' || l_boundary || UTL_TCP.crlf);
    UTL_SMTP.write_data(l_mail_conn, 'Content-Type: ' || p_attach_mime || '; name="' || p_attach_name || '"' || UTL_TCP.crlf);
    UTL_SMTP.write_data(l_mail_conn, 'Content-Disposition: attachment; filename="' || p_attach_name || '"' || UTL_TCP.crlf || UTL_TCP.crlf);
 
    FOR i IN 0 .. TRUNC((DBMS_LOB.getlength(p_attach_clob) - 1 )/l_step) LOOP
      UTL_SMTP.write_data(l_mail_conn, DBMS_LOB.substr(p_attach_clob, l_step, i * l_step + 1));
    END LOOP;

    UTL_SMTP.write_data(l_mail_conn, UTL_TCP.crlf || UTL_TCP.crlf);
  END IF;
  
  UTL_SMTP.write_data(l_mail_conn, '--' || l_boundary || '--' || UTL_TCP.crlf);
  UTL_SMTP.close_data(l_mail_conn);

  UTL_SMTP.quit(l_mail_conn);
END;
/
The code below shows how the procedure is called.
DECLARE
  l_clob CLOB := 'This is a very small CLOB!';
BEGIN
  send_mail(p_to          => 'me@mycompany.com',
            p_from        => 'admin@mycompany.com',
            p_subject     => 'Test Message',
            p_text_msg    => 'This is a test message.',
            p_attach_name => 'test.txt',
            p_attach_mime => 'text/plain',
            p_attach_clob => l_clob,
            p_smtp_host   => 'smtp.mycompany.com');
END;
/

Find a concurrent program's trace file

SELECT
req.request_id
,req.logfile_node_name node
,req.oracle_Process_id
,req.enable_trace
,dest.VALUE||'/'||LOWER(dbnm.VALUE)||'_ora_'||oracle_process_id||'.trc' trace_filename
,prog.user_concurrent_program_name
,execname.execution_file_name
,execname.subroutine_name
,phase_code
,status_code
,ses.SID
,ses.serial#
,ses.module
,ses.machine
FROM
fnd_concurrent_requests req
,v$session ses
,v$process proc
,v$parameter dest
,v$parameter dbnm
,fnd_concurrent_programs_vl prog
,fnd_executables execname
WHERE 1=1
AND req.request_id = &request
AND req.oracle_process_id=proc.spid(+)
AND proc.addr = ses.paddr(+)
AND dest.NAME='user_dump_dest'
AND dbnm.NAME='db_name'
AND req.concurrent_program_id = prog.concurrent_program_id
AND req.program_application_id = prog.application_id
AND prog.application_id = execname.application_id
AND prog.executable_id=execname.executable_id

Concurrent Program Specific SQL Queries

To fetch responsibility assigned to a concurrent program
===========================================================
select resp.responsibility_name
from fnd_responsibility_vl resp, fnd_request_group_units rgu, fnd_concurrent_programs_vl prog
where resp.request_group_id = rgu.request_group_id
AND rgu.request_unit_id = prog.concurrent_program_id
AND rgu.unit_application_id = prog.application_id
AND prog.user_concurrent_program_name = ;


To fetch details of executables and concurrent programs
===========================================================

select
prog.user_concurrent_program_name "program name",
prog.concurrent_program_name "program short name",
appl.application_name "program application name",
prog.description "program description",
exe.executable_name "executable name",
exe.execution_file_name "executable file name",
exe.description "executable description",
decode( exe.execution_method_code, 'I', 'PLSQL Stored Procedure', 'P', 'Report', 'L', 'SQL Loader', exe.execution_method_code) "execution method"
from
fnd_executables exe,
fnd_application_tl appl,
fnd_concurrent_programs_vl prog
where prog.application_id = appl.application_id
AND exe.executable_id = prog.executable_id
AND prog.user_concurrent_program_name = ''
AND prog.concurrent_program_name = ''
AND exe.execution_file_name =''
===========================================================

PLSQL block with bulk collect and limit

DECLARE
CURSOR get_item_det_cur (
p_in_num_from_itemid IN NUMBER,
p_in_num_to_itemid IN NUMBER
)
IS
SELECT msib.inventory_item_id, msib.organization_id
FROM mtl_system_items_b msib
WHERE msib.segment2 = msib.attribute5
AND msib.organization_id = 81
AND msib.inventory_item_id BETWEEN p_in_num_from_itemid
AND p_in_num_to_itemid;

TYPE item_det_tbl IS TABLE OF get_item_det_cur%ROWTYPE
INDEX BY BINARY_INTEGER;

l_item_det_tbl item_det_tbl;
l_item_id NUMBER;
l_org_id NUMBER;
l_cnt NUMBER := 0;
BEGIN
OPEN get_item_det_cur (1174281, 1174500);

LOOP
l_cnt := l_cnt + 1;
DBMS_OUTPUT.put_line ('l_cnt==>' || l_cnt);

FETCH get_item_det_cur
BULK COLLECT INTO l_item_det_tbl LIMIT 10;

FOR idx IN l_item_det_tbl.FIRST .. l_item_det_tbl.LAST
LOOP
l_item_id := l_item_det_tbl (idx).inventory_item_id;
l_org_id := l_item_det_tbl (idx).organization_id;
DBMS_OUTPUT.put_line ('l_item_id==>' || l_item_id);
DBMS_OUTPUT.put_line ('l_org_id==>' || l_org_id);
END LOOP;
END LOOP;

CLOSE get_item_det_cur;
END;

Difference between Lookups and Value Sets

I hope you have read the previous articles on Value Sets and also on Lookups.

Difference 1
Value sets can be attached to parameters of a concurrent program, whereas Lookups can't.

Difference 2
Certain types of Lookups are maintainable by the users too, for example HR Users will maintain "Ethnic Minority" lookups. Value Sets are almost never maintained by end users, with the exception of GL Flexfield codes. Value sets are usually maintained by System Administrators.

Difference 3
Value sets can contain values that are a result of an SQL Statement.
Hence it is possible to make Value Set list of values dynamic.
On the contrary, Lookup Codes are Static list of values.