Receivables lets you define standard payment terms for your customers to specify the due date and discount date for their open items.
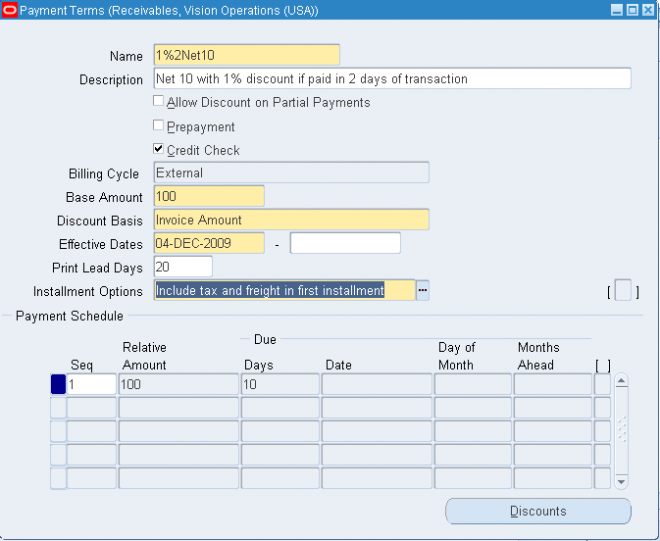
Payment terms can include a discount percent for early payment and you can assign multiple discounts to each payment term line. For example, the payment term ’2% 10, Net 30’ indicates that a customer is allowed a two percent discount if payment is received within 10 days; after 10 days, the entire balance is due within 30 days of the transaction date with no applicable discount.
Prepayment check box if you are defining a prepayment payment term. Receivables feeder systems, such as Oracle Order Management, can optionally implement business processes around prepayment payment terms to indicate that a particular business transaction requires the capture of funds before the delivery of a product or service.
Enter the Date on which payment is due for this installment term (optional). If you do not complete this field, enter a value for either Due Days or both Day of Month and Months Ahead
Default Payment Terms Hierarchy
Receivables use the following hierarchy to determine the default payment term for your transactions, stopping when one is found:
1. Bill–to site
2. Customer Address
3. Customer
4. Transaction Type
Predefined Payment Terms
Receivables provides the following predefined payment terms:
30 NET: The balance of the transaction is due within 30 days.
IMMEDIATE: The balance of the transaction is due immediately (i.e. on the transaction date). You can use this payment term with your chargeback and debit memos.
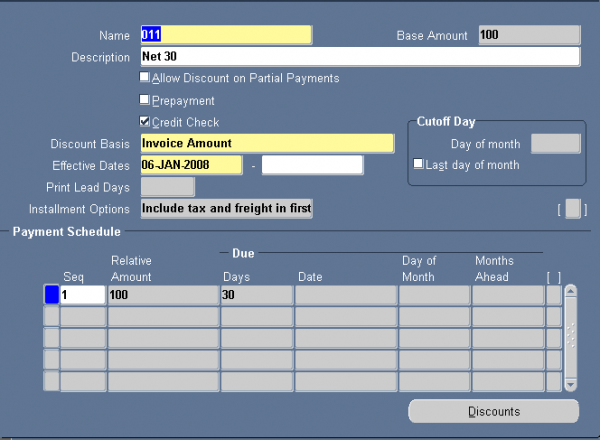
To define a payment term:
Navigate to the Payment Terms window and Enter the Name of the payment term.
1. Select the Prepayment check box if you are defining a prepayment payment term.
Receivables feeder systems, such as Oracle Order Management, can optionally implement business processes around prepayment payment terms to indicate that a particular business transaction requires the capture of funds before the delivery of a product or service.
2. To associate a credit check with this payment term, check the Credit Check box. Oracle Order Management uses this information to determine when to place an order on hold.
In Oracle Order Management, if the profile for an address does not have credit checking limits defined in a particular currency but the customer does, then the order passes credit check. If the address does not have limits in the currency and neither does the customer, then the order is compared to the customer limit in that currency.
3. If you do not want to let your customers take discounts for partial payments on items associated with this payment term, then uncheck both the Allow Discount on Partial Payments check box as well as the check box for the Discount on Partial Payment system option.
4. Enter the Discount Basis you want Receivables to use when calculating discounts for your invoices. Choose one of the following discount methods:
6. Enter the Base Amount for this payment term. The default is 100, but you can change it. The base amount is the denominator for the ratio Receivables uses to determine the amount due for installments of invoices to which you assign this payment term. The sum of the relative amounts for all of the payment schedules that you define for these payment terms must be equal to the value that you specify as a base amount.
If the base amount is different from the relative amount, and you set the Installment Options field for this payment term to 'Allocate tax and freight', Receivables prorates the base amount across the relative amounts of this term's payment schedules based upon the ratio you define. Receivables uses the following equation to determine the original amount due for each installment of invoices to which you assign this payment term:
Amount Due = Relative Amount/Base Amount * Invoice Amount
If you select 'Include tax and freight in first installment' as the Installment Options field value for a payment term, the base amount and the relative amounts that you specify for this term's payment schedules only indicate how the original line amounts of the invoices to which you assign this term are distributed across different installments.
In this case, the original freight and tax amounts are included in the first installment in addition to the line amount allocated by the ratio of the base amount and the relative amount that you specify for the term's first payment schedule. Receivables uses the following equation to determine the original amount due for the first installment of invoices to which you assign this payment term:
Amount Due = (Relative Amount/Base Amount * Base Line Amount) + Base Freight Amount + Base Tax Amount
7. If you want transactions assigned to this payment term to be printed before the due date, enter a number of Print Lead Days. Receivables will print this transaction x number of days before the due date, where x is the number of days you enter here.
8. Enter a range of Effective Dates for this payment term. If you do not enter an end date, this payment term will be active indefinitely.
9.1 Enter a line number for the installment term that you are defining in the 'Seq' field. Enter a higher number for each installment term with a later due date. For example, if you create terms with 50% due in 15 days and 50% in 30 days, enter '1' in this field for the first line and '2' for the second line.
9.2 Enter the Relative Amount for this payment term. This is the numerator of the ratio that Receivables uses to determine the amount due for this installment of these payment terms. The sum of the relative amounts for all of the payment schedules that you define for each payment term must be equal to the base amount for this term.
9.3 Enter the number of Days after the invoice date that payment is due for this installment term (optional). For split payment terms, this number indicates the number of days after the invoice date that an installment is due.
9.4 Enter the Date on which payment is due for this installment term (optional). If you do not complete this field, enter a value for either Due Days or both Day of Month and Months Ahead.
9.5 If you are defining proxima terms, enter the Day of Month that payment is due for this installment term. For example, if payment is due on the fifteenth of each month, enter '15.'
9.6 If you are defining proxima terms and you entered a value for Day of Month, enter the Months Ahead to which this installment term of the proxima terms refer. For example, if you entered '15' for Day of Month and you enter '2' here, an invoice dated in May will have a due date of July 15.
New in R12
If you want to use this payment term for balance forward billing, select an appropriate balance forward billing cycle from the Billing Cycle LOV.
Because balance forward bills cannot be split across installments, in the case of a balance forward payment term:
Any value entered in Base Amount defaults to 100.
Installment Options becomes disabled and any data entered before selecting a cycle defaults to Include tax and freight in first installment.
You can populate only one row in the Payment Schedule section and the Sequence Number and Relative Amount values for the row default respectively to 1 and 100.
Date Due becomes disabled. However, you can populate Days, Day of Month, and Months Ahead.
Note: You cannot change existing payment terms from regular payment terms to balance forward billing payment terms and vice versa.
Payment terms can include a discount percent for early payment and you can assign multiple discounts to each payment term line. For example, the payment term ’2% 10, Net 30’ indicates that a customer is allowed a two percent discount if payment is received within 10 days; after 10 days, the entire balance is due within 30 days of the transaction date with no applicable discount.
Prepayment check box if you are defining a prepayment payment term. Receivables feeder systems, such as Oracle Order Management, can optionally implement business processes around prepayment payment terms to indicate that a particular business transaction requires the capture of funds before the delivery of a product or service.
Enter the Date on which payment is due for this installment term (optional). If you do not complete this field, enter a value for either Due Days or both Day of Month and Months Ahead
Default Payment Terms Hierarchy
Receivables use the following hierarchy to determine the default payment term for your transactions, stopping when one is found:
1. Bill–to site
2. Customer Address
3. Customer
4. Transaction Type
Predefined Payment Terms
Receivables provides the following predefined payment terms:
30 NET: The balance of the transaction is due within 30 days.
IMMEDIATE: The balance of the transaction is due immediately (i.e. on the transaction date). You can use this payment term with your chargeback and debit memos.
To define a payment term:
Navigate to the Payment Terms window and Enter the Name of the payment term.
1. Select the Prepayment check box if you are defining a prepayment payment term.
Receivables feeder systems, such as Oracle Order Management, can optionally implement business processes around prepayment payment terms to indicate that a particular business transaction requires the capture of funds before the delivery of a product or service.
2. To associate a credit check with this payment term, check the Credit Check box. Oracle Order Management uses this information to determine when to place an order on hold.
In Oracle Order Management, if the profile for an address does not have credit checking limits defined in a particular currency but the customer does, then the order passes credit check. If the address does not have limits in the currency and neither does the customer, then the order is compared to the customer limit in that currency.
3. If you do not want to let your customers take discounts for partial payments on items associated with this payment term, then uncheck both the Allow Discount on Partial Payments check box as well as the check box for the Discount on Partial Payment system option.
4. Enter the Discount Basis you want Receivables to use when calculating discounts for your invoices. Choose one of the following discount methods:
- Invoice Amount: Choose this option to calculate the discount amount based on the sum of the tax, freight charges, and line amounts of your invoices.
- Lines Only: Choose this option to calculate the discount amount based on only the line amounts of your invoices.
- Lines, Freight Items and Tax: Choose this option to calculate the discount amount based on the amount of line items, freight, and tax of your invoices, but not freight and charges at the invoice header level.
- Lines and Tax, not Freight Items and Tax: Choose this option to calculate the discount amount based on the line items and their tax amounts, but not the freight items and their tax lines, of your invoices.
6. Enter the Base Amount for this payment term. The default is 100, but you can change it. The base amount is the denominator for the ratio Receivables uses to determine the amount due for installments of invoices to which you assign this payment term. The sum of the relative amounts for all of the payment schedules that you define for these payment terms must be equal to the value that you specify as a base amount.
If the base amount is different from the relative amount, and you set the Installment Options field for this payment term to 'Allocate tax and freight', Receivables prorates the base amount across the relative amounts of this term's payment schedules based upon the ratio you define. Receivables uses the following equation to determine the original amount due for each installment of invoices to which you assign this payment term:
Amount Due = Relative Amount/Base Amount * Invoice Amount
If you select 'Include tax and freight in first installment' as the Installment Options field value for a payment term, the base amount and the relative amounts that you specify for this term's payment schedules only indicate how the original line amounts of the invoices to which you assign this term are distributed across different installments.
In this case, the original freight and tax amounts are included in the first installment in addition to the line amount allocated by the ratio of the base amount and the relative amount that you specify for the term's first payment schedule. Receivables uses the following equation to determine the original amount due for the first installment of invoices to which you assign this payment term:
Amount Due = (Relative Amount/Base Amount * Base Line Amount) + Base Freight Amount + Base Tax Amount
7. If you want transactions assigned to this payment term to be printed before the due date, enter a number of Print Lead Days. Receivables will print this transaction x number of days before the due date, where x is the number of days you enter here.
8. Enter a range of Effective Dates for this payment term. If you do not enter an end date, this payment term will be active indefinitely.
9.1 Enter a line number for the installment term that you are defining in the 'Seq' field. Enter a higher number for each installment term with a later due date. For example, if you create terms with 50% due in 15 days and 50% in 30 days, enter '1' in this field for the first line and '2' for the second line.
9.2 Enter the Relative Amount for this payment term. This is the numerator of the ratio that Receivables uses to determine the amount due for this installment of these payment terms. The sum of the relative amounts for all of the payment schedules that you define for each payment term must be equal to the base amount for this term.
9.3 Enter the number of Days after the invoice date that payment is due for this installment term (optional). For split payment terms, this number indicates the number of days after the invoice date that an installment is due.
9.4 Enter the Date on which payment is due for this installment term (optional). If you do not complete this field, enter a value for either Due Days or both Day of Month and Months Ahead.
9.5 If you are defining proxima terms, enter the Day of Month that payment is due for this installment term. For example, if payment is due on the fifteenth of each month, enter '15.'
9.6 If you are defining proxima terms and you entered a value for Day of Month, enter the Months Ahead to which this installment term of the proxima terms refer. For example, if you entered '15' for Day of Month and you enter '2' here, an invoice dated in May will have a due date of July 15.
New in R12
If you want to use this payment term for balance forward billing, select an appropriate balance forward billing cycle from the Billing Cycle LOV.
- Balance Forward Billing.
- Balance Forward Billing Cycles.
- Setting Up Balance Forward Billing.
Because balance forward bills cannot be split across installments, in the case of a balance forward payment term:
Any value entered in Base Amount defaults to 100.
Installment Options becomes disabled and any data entered before selecting a cycle defaults to Include tax and freight in first installment.
You can populate only one row in the Payment Schedule section and the Sequence Number and Relative Amount values for the row default respectively to 1 and 100.
Date Due becomes disabled. However, you can populate Days, Day of Month, and Months Ahead.
Note: You cannot change existing payment terms from regular payment terms to balance forward billing payment terms and vice versa.