The following topics will be discussed in this article:
1. Overview
Order Management allows the customers to return the goods to you. OM also enables you to authorize the return of your sales orders as well as sales made by other dealers or suppliers, as long as the items are part of your item master and price list. You can authorize returns for replacement that returns with or without credit.
2. Creating a New Return (RMA with Credit)
Order Information – Others
3. Creating a Return using the Copy Function (RMA with Credit)
Quick Copy Tab:
To exclude child entities (lines, sales credits, notes, descriptive flex, and holds) or to re-price, navigate to the Copy Header, Copy Line, and Pricing Options tabs and deselect options as desired.
A common use of the Copy function is in the case where a customer wants to return all or part of a previous sales order. You may use the Copy function to create the return based directly on the information contained in the original sales order.
Another advantage of using the Copy function to create your RMAs is in the case where the customer will be receiving a credit for the return, Oracle can use the original sales order number to identify the original invoice in Accounts Receivable, and apply the credit directly against the original invoice.
When creating returns for configurations, copy the model line. Select the specific order lines and copy them as return lines to return individual components of a PTO configuration.
Pricing Tab
If any validation errors occur, message(s) in the Messages window are displayed and indicates that an order was successfully created.
To update and book the RMA, select the RMA from Today’s Orders in the Order Organizer window.
You have the option to manually make changes to this RMA before booking it. For example, the customer may only want to return part of one line or not return another line at all.
You may optionally update the Receive From and Credit To Addresses using the Addresses Tab in the Line Items Tab.
Under the Actions button, there are several other options:
Return Lot/Serial Numbers – You can enter lot and serial numbers for the return.
To book the order, select the Book Order button.
4. Creating a New Return (RMA no Credit)
The process for creating an RMA no Credit is identical to creating an RMA with Credit. You have the option to create the RMA using the New Return option or the Copy option. The only difference between the two processes is that the Invoice Interface does not exist in the workflow for an Order Type of RMA no Credit. As a result, no credit memo will be created for this RMA.
5. Creating a New Return (RMA Credit Only)
The process for creating an RMA Credit Only is identical to creating an RMA with Credit. You have the option to create the RMA using the New Return option or the Copy option. The only difference between the two processes is that the Fulfillment activity does not exist in the workflow for an Order Type of RMA no Credit. As a result, no physical return of product is required.
6. RMA Receipt
All the receipt lines that meet the search criteria are displayed in the Receiving Transaction form.
Only lines with a “Destination Type” of “Inventory” can be delivered to Inventory.
Save. Once the transaction is saved a receipt number is assigned.
For more information on Receiving Transactions in Purchasing refer to related R2i Purchasing Training documentation.
7. Viewing the Status of an RMA
The Sales Orders window displays the RMA header status in the Main tab of the Order Information tabbed region. The RMA line status is displayed in the Main tab of the Line Items tabbed region.
The Workflow Status option on the Sales Order window Tools menu launches the workflow status page. The window shows all the activities an RMA header or line has completed and the corresponding results in tabular format.
8. Close the RMA
Closing RMAs that are complete enhances performance, since many programs, windows and report queries retrieve open RMAs only.
An RMA line is closed automatically once it has completed its corresponding workflow successfully. An RMA header is closed at the end of the month once all the lines have been closed.


Creating RMAs
There are three ways to create RMA's within Order Management.
- Overview of RMA
- Creating a New Return (RMA with Credit)
- Creating a Return using the Copy Function (RMA with Credit)
- Creating a New Return (RMA no Credit)
- Creating a New Return (RMA Credit Only)
- RMA Receipt
- Viewing the status of RMA
- Close RMA
Pre-requisites:
- Return Order Categories and Transaction Types have been defined.
- Items exist in the Item Master with the attribute Returnable enabled.
- Those items must exist on a Price List.
- Customers exist in the Customer Master.
- Return reasons have been defined.
- Discounts have been defined.
1. Overview
Order Management allows the customers to return the goods to you. OM also enables you to authorize the return of your sales orders as well as sales made by other dealers or suppliers, as long as the items are part of your item master and price list. You can authorize returns for replacement that returns with or without credit.
RMA can be created in two different ways in Oracle:
- Create a New Return which will create the RMA from scratch
- Copy an original order into an order with an RMA Order Type
R2i supports four different RMA Order Types, each with a different Order Cycle:
- RMA with Credit is used when the customer returns the physical product and also receives credit as a result of the return.This type applies for:
- Defective Product
- Customer does not like the product
- Product does not meet the customer’s expectations
- RMA no Credit is used when the customer will return the product but will not be receiving a credit as a result of the return.These returns would be for:
- Evaluation Orders
- Samples
- Other orders where the customer was not originally charged for the product.
- RMA Credit Only is used when the customer will receive a credit, but the physical return of the product is not required.
- These credits are generally used by software companies when the customer destroys the CD or disk and erases the software from their machine, but no physical thing to return.
- RMA with Credit and Approval is used in the same manner as an RMA with Credit but this order cycle includes an approval process that requires someone to approve the RMA before it is booked. In order for an order/return or order/return line approval workflow to work correctly the profile option OM: Notification Approver must have a value.
Select:
|
Order Management responsibility
|
Navigate to:
|
Orders, Returns > Order Organizer or
Orders, Returns > Sales Orders
|
Select:
|
New Order button if using the Order Organizer
|
 |
| Customer: |
Enter Customer Name (Customer Number will default in).
|
| Customer Number: |
Alternatively, enter Customer Number and the Customer Name will default in.
|
| Order Type: |
RMA Order with Credit
|
| Customer PO: |
Enter a Customer PO number if the order type you selected requires it.
|
| Date Ordered: |
The Current Date will default in as the Order Date. You may change this date or accept the current date.
|
| Customer Contact: |
Enter a Customer contact (optional).
|
| Order Number: |
Oracle will assign the RMA number as soon as the information is saved if automatic numbering is enabled.
|
| Price List: |
Select a price list from the list of values
|
| Ship To: |
Enter the customer’s ship-to address from the list of values or accept the default. (Not required for Returns)
|
| Salesperson: |
Enter the Salesperson
|
| Status: |
The initial entry status for an RMA is Entered. After Booking the RMA status will changed to Booked.
|
| Currency: |
Select the currency for the RMA from the list of values or accept the default.
|
| Bill To: |
Enter the customer’s bill-to address from the list of values or accept the default.
|
 |
| Payment Terms: | Payment Terms are user-definable and must be setup in advance. (Setup>Orders>Payment Terms). Select from the list of values or accept the default. (Not required for Returns) |
| Sales Channel: | Sales Channels are user-definable and must be setup in advance (Order Management Quick Codes). Select a Sales Channel from the list of values or accept the default. |
| Warehouse: | Select a Warehouse (inventory organization) from which Returns will be received. |
| Shipping Method: | Not used for Returns |
| Line Set: | Not used for Returns |
| Freight Terms: | |
| FOB: | Defaults (In order, from Ship-To, Bill-To, Customer, Order Type, or Price List) |
| Shipment Priority: | Defaults from Order Type |
| Shipping Instruct: | Shipping instructions are printed on the pick slip. Since this is a return do not use this field. |
| Packing Instructions: | Packing instructions are printed on the pack slip. Since this is a return do not use this field. |
| Tax Handling: | Select from the following: Exempt – Indicates that this order is exempt for a normally taxable customer site and/or item. If you select exempt you must enter a reason for exemption. Require – Indicates that this order is taxable for a normally non- taxable customer and/or item. Standard – Indicates that taxation should be based on existing exemption rules. If the customer has a tax exemption defined, Order Management displays any certificate number and reason for the exemption in the corresponding fields. |
| Tax Exempt Number: | If you choose Exempt in the Tax Handling field then select an existing certificate number for the ship-to customer, or enter a new, unapproved exemption certificate number. If you chose Standard in the Tax Handling field, an existing exemption rule may display a certificate number in this field. Unapproved exemption certificate numbers can be approved using the Tax Exemptions window. |
| Exempt Reason: | If you chose Exempt in the Tax Handling field then select an exemption reason. If you chose Standard in the Tax Handling field, an existing exemption rule may display an exemption reason in this field. You can define tax exemption reasons using the Receivables Quickcodes window. |
| Payment Type: | |
| Amount: | Optional unless the payment type selected requires it. |
| Check Number: | Optional unless the payment type selected requires it. |
| Credit Card Type: | Optional unless the payment type selected requires it. |
| Credit Card Num: | Optional unless the payment type selected requires it. |
| Card Holder: | Optional unless the payment type selected requires it. |
| Card Expiration Date: | Optional unless the payment type selected requires it. |
| Approval Code: | Optional unless the payment type selected requires it. |
| Order Source: | If the RMA is copied from an existing order/return ‘Copy’ will appear in this field. |
| Order Source Rule: | If the RMA is copied from an existing order/return the original order/return number will appear in this field. |
Line Items Tab – Returns
 |
| Line: |
This field will automatically be populated.
|
| Ordered Item: |
Enter the Ordered Item from the list of values.
|
| Qty: |
Enter the quantity to be returned.
|
| Return Reason: |
Select a defined reason from the list of values.
|
| Line Type: |
Select a line type. A line type may default depending on the transaction type setup. Select a line type from the list of values if you wish to change the defaulted value.
|
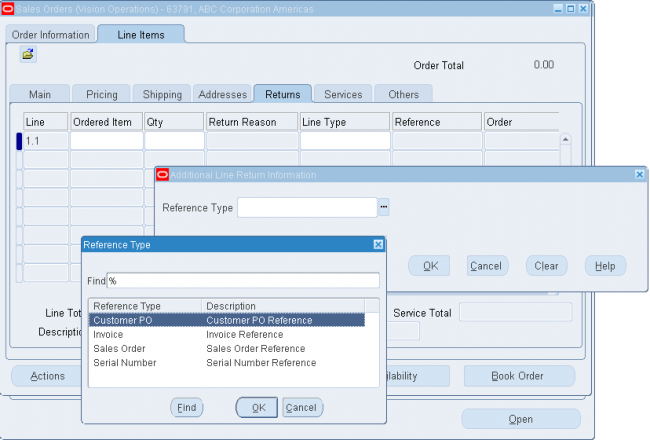
| Reference: |
Select the appropriate Reference Type. Use the Reference Type if you want to refer to a specific Invoice, Purchase Order, or Sales Order. These references must be for transactions originally placed in Oracle. You have the option of leaving them blank, in which case the customer’s credit will be placed On Account when it interfaces to Accounts Receivable. On Account credit memos may be applied to invoices at a future time.
|
| Order: |
If referencing a Sales Order then enter the Sales Order number.
|
| Line: |
If referencing a Sales Order enter the appropriate line number from the Sales Order referenced.
Note: If creating the RMA using the copy function the information in the copied Sales Order will automatically populate in this field.
|
| Invoice: |
If you enter Sales Order or Invoice in the Reference field, then you have the option of selecting a specific invoice in the Invoice field. This would allow for a Credit Memo to be created and directly applied to this invoice. Leaving this field blank will yield an On Account credit memo in Receivables.
|
| Invoice Line: |
If referencing an Invoice, enter the appropriate line number from the Invoice referenced.
|
| Credit Invoice: | |
| Item Revision: |
Line Items Tab – Main
 |
UOM:
|
The UOM will default in based on the item selected to be returned.
|
Unit Selling Price:
|
The price defaults in from the invoice, purchase order, sales order, or invoice if selected in the reference field, otherwise, it will default from the price list selected on the Return.
|
3. Creating a Return using the Copy Function (RMA with Credit)
Select:
|
Order Management responsibility
|
Navigate to:
|
Orders, Returns > Order Organizer
|
Query:
|
Query an existing order or return to copy from.
|
Select:
|
Actions button in the Order Organizer window
|
Select:
|
Copy
|
Quick Copy Tab:
 |
Select:
|
Create New Order
|
Change Order Type To:
|
Select RMA Order with Credit
|
New Order Number:
|
Enter a new RMA number for RMA order types that require manual numbering.
|
Copy Header Tab
 |
To exclude child entities (lines, sales credits, notes, descriptive flex, and holds) or to re-price, navigate to the Copy Header, Copy Line, and Pricing Options tabs and deselect options as desired.
| Note: | The OM: Credit Card Privileges profile option determines whether you are able to copy customer credit card information. |
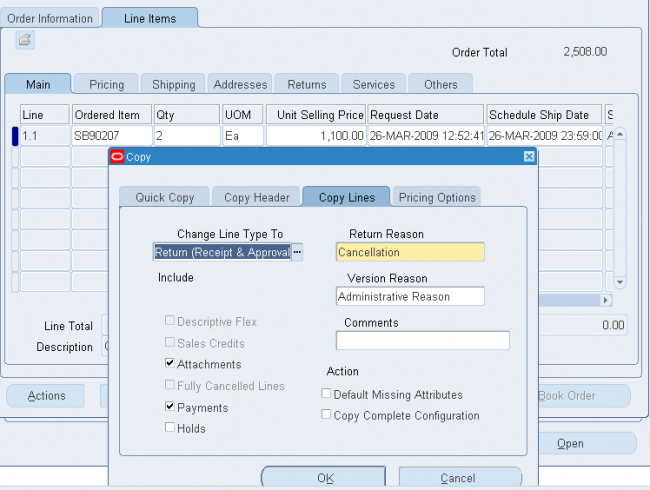
Copy Lines Tab
 |
Change Line Type To:
|
Select RMA Line with Credit
|
Return Reason Code:
|
Select a return reason from the list of values.
|
Include Lines:
|
Includes the lines from the original order/return.
|
| Include Descriptive Flex: | Includes the descriptive flexfield values from the original order/return. |
| Include Attachments: | Includes the attachments from the original order/return. |
| Include Fully Cancelled Lines: | Determine whether to include/exclude fully cancelled lines when using the copy feature. If fully cancelled lines are included, the lines are copied over with the original ordered quantity. |
A common use of the Copy function is in the case where a customer wants to return all or part of a previous sales order. You may use the Copy function to create the return based directly on the information contained in the original sales order.
Another advantage of using the Copy function to create your RMAs is in the case where the customer will be receiving a credit for the return, Oracle can use the original sales order number to identify the original invoice in Accounts Receivable, and apply the credit directly against the original invoice.
When creating returns for configurations, copy the model line. Select the specific order lines and copy them as return lines to return individual components of a PTO configuration.
Pricing Tab
 |
| At Original Selling Price: | Select this option if you want the return to contain the original selling price in the originating order or return. Retaining the original pricing will retain all discounts and charges and the Calculate Price Flag is set to ‘Partial’ for return lines. |
| Re-price as of this date: | If you choose to re-price, specify the pricing date. Manual discounts and charges are removed and automatic discounts and charges are recalculated. |
| Select: | OK button. This will perform the copy and close the window. |
 |
If any validation errors occur, message(s) in the Messages window are displayed and indicates that an order was successfully created.
| Select: | Continue button. The newly copied order is available through Order Organizer. |
To update and book the RMA, select the RMA from Today’s Orders in the Order Organizer window.
| Select: | Open button. |
 |
 |
- The original sales order from which this RMA was created is identified both at the header level (in the Order Source field of the Others tab) and at the line level (in the Order Source field of the Main tab).
You have the option to manually make changes to this RMA before booking it. For example, the customer may only want to return part of one line or not return another line at all.
You may optionally update the Receive From and Credit To Addresses using the Addresses Tab in the Line Items Tab.
Under the Actions button, there are several other options:
Promotions/Pricing Attributes – You may optionally apply Discounts to each lines at this time (assuming that Discounts have been defined and you have the appropriate discounting privileges). A Discount will decrease the amount of the credit the customer will receive.
Return Lot/Serial Numbers – You can enter lot and serial numbers for the return.
Sales Credits – If the Sales Credits button was checked in preparing the Copy then Sales Credits for the return will be derived from the original order. You may change the Sales Credits for the return if you wish by using this option.
To book the order, select the Book Order button.
4. Creating a New Return (RMA no Credit)
Select:
|
Order Management responsibility
|
Navigate to:
|
Orders, Returns > Order Organizer or
Orders, Returns > Sales Orders
|
Select:
|
New Order button if using the Order Organizer
|
The process for creating an RMA no Credit is identical to creating an RMA with Credit. You have the option to create the RMA using the New Return option or the Copy option. The only difference between the two processes is that the Invoice Interface does not exist in the workflow for an Order Type of RMA no Credit. As a result, no credit memo will be created for this RMA.
| Note: | Oracle does not provide a seeded workflow process to handle RMAs with Receipt no Credit; therefore, the R2i control environment provides a custom process to fulfill this need. For further information on this custom process refer to OM Transaction Types Setup and R2i OM Order Line Workflow Package. |
5. Creating a New Return (RMA Credit Only)
Select:
|
Order Management responsibility
|
Navigate to:
|
Orders, Returns > Order Organizer or
Orders, Returns > Sales Orders
|
Select:
|
New Order button if using the Order Organizer
|
The process for creating an RMA Credit Only is identical to creating an RMA with Credit. You have the option to create the RMA using the New Return option or the Copy option. The only difference between the two processes is that the Fulfillment activity does not exist in the workflow for an Order Type of RMA no Credit. As a result, no physical return of product is required.
6. RMA Receipt
Select:
|
Purchasing Super User R2i responsibility
|
Navigate to:
|
Receiving > Receipts
|
Select:
|
The Inventory Organization for the Receipt (not Global).
|
Select:
|
OK button.
|
 |
 |
Select:
|
The Customer tab in the Find Expected Receipts window.
|
RMA Num:
|
Optionally enter a specific RMA number.
|
Line Num:
|
Optionally enter a specific line number on a specific RMA.
Note: Can only enter a line number if you have enter a number in the RMA Num field.
|
Line Type:
|
This field will populate automatically if you enter a value in RMA Num. If you do not enter a value in RMA Num you can optionally select a line type.
|
Customer:
|
Optionally select a customer from the LOV. If you enter a value in RMA Num, this field will populate automatically.
|
Customer Num:
|
Optionally select a customer number from the LOV. If you enter a value in RMA Num, this field will populate automatically.
|
Customer Item Num:
|
Optionally select a customer item number from the LOV.
|
- You can further search for expected receipts using the Item, Date Ranges, and Shipments tabs.
Select:
|
Find button.
|
 |
All the receipt lines that meet the search criteria are displayed in the Receiving Transaction form.
Only lines with a “Destination Type” of “Inventory” can be delivered to Inventory.
| Select: | Checkbox next to receipt line to be delivered to inventory. |
| Quantity: | Enter the “Quantity” to be delivered. |
| Subinventory: | Enter the subinventory where the items will be delivered to. |
 |
Save. Once the transaction is saved a receipt number is assigned.
 |
For more information on Receiving Transactions in Purchasing refer to related R2i Purchasing Training documentation.
7. Viewing the Status of an RMA
The Sales Orders window displays the RMA header status in the Main tab of the Order Information tabbed region. The RMA line status is displayed in the Main tab of the Line Items tabbed region.
The Workflow Status option on the Sales Order window Tools menu launches the workflow status page. The window shows all the activities an RMA header or line has completed and the corresponding results in tabular format.
 |
Note:In order to view workflow status from the Order Organizer the menu attached to the responsibility in use must have two functions assigned to it: Monitor Activities List and Workflow Status. For more information see the appropriate AOL documentation.
|
8. Close the RMA
Closing RMAs that are complete enhances performance, since many programs, windows and report queries retrieve open RMAs only.
An RMA line is closed automatically once it has completed its corresponding workflow successfully. An RMA header is closed at the end of the month once all the lines have been closed.
Return Materials Authorization (RMA):
Oracle Order Management provides Return Materials Authorization (RMA) functionality within the Sales Orders window, where you can enter both standard and return order lines within the same order.
An order can have a mix of outbound (standard) and inbound (return) lines, as restricted by the order type definition.
A return line is indicated by Line Type Category of return negative and highlighted item quantity and negative line total.
A return line is indicated by Line Type Category of return negative and highlighted item quantity and negative line total.

Return Line types can include flows like

Creating RMAs
There are three ways to create RMA's within Order Management.
- First, identify a sales order to be returned and query the order lines. After you have selected the sales order or order lines, use the Copy function in the Actions list to generate the return order or line by specifying an RMA line type.
- Second, reference a sales order, invoice, PO number or serial number of an item directly in the Return Reference field within the Line Items tab of the Sales Orders window.
- Lastly, for return without originating sales order line, manually enter return line information and choose the appropriate return line type in the Sales Orders window.
Workflow
Order Management comes with seeded Oracle Workflow processes. Review the seeded flows, activities and notifications to determine if the seeded data can meet your business needs. To successfully enter an RMA in OM, you can use the Generic - Order Flow Return with Approval and Line Flow - Return for Credit only.
With services, OM will use only the seeded "Return for Credit Only" workflow for returning service items when product items are returned
Transaction Types
Both order and line transaction types need to be setup in order to process an RMA.Credit order types have an order type category Return. An order with a Mixed order type category can contain both standard and return lines. Line level workflow processes are assigned based on the order type, line type, and item type combination. When you setup a return order type or mixed order type, you have the option to set a default return line type, so that the user doesn't have to manually choose the line type unless they want it to be different.
Both order and line transaction types need to be setup in order to process an RMA.Credit order types have an order type category Return. An order with a Mixed order type category can contain both standard and return lines. Line level workflow processes are assigned based on the order type, line type, and item type combination. When you setup a return order type or mixed order type, you have the option to set a default return line type, so that the user doesn't have to manually choose the line type unless they want it to be different.
Master Items
You can create a return line only if an item is Returnable. Therefore, a standard, finished good item should be defined in Oracle Inventory with appropriately set attributes. The best way to create your items is to copy them from the Finished Good seeded template and set additional attributes as needed in the Master Item window
You can create a return line only if an item is Returnable. Therefore, a standard, finished good item should be defined in Oracle Inventory with appropriately set attributes. The best way to create your items is to copy them from the Finished Good seeded template and set additional attributes as needed in the Master Item window
Return Reason Codes
You can set up your own reason codes in the Receivables QuickCodes window. Navigate to the Order Management responsibility and select the menu: Setup > Quickcodes > Receivables. The Oracle Receivables Lookup window will appear. Query the CREDIT_MEMO_REASON code from the query manager (Flashlight icon). View the existing codes or add a new code. These codes appear in the Return Reason list of values.
You can set up your own reason codes in the Receivables QuickCodes window. Navigate to the Order Management responsibility and select the menu: Setup > Quickcodes > Receivables. The Oracle Receivables Lookup window will appear. Query the CREDIT_MEMO_REASON code from the query manager (Flashlight icon). View the existing codes or add a new code. These codes appear in the Return Reason list of values.

- Freight and Special Charges for Returns
When setting up freight or special charges, you can specify if the charge is returnable, meaning the charge may be refunded. When you create a return line from an original order line, you should copy the refundable invoiced charges. You can also setup special charges to be applied specifically to returns, like restocking fees, return handling, damage etc. You can set this through an attribute called Refundable Flag (Include on Returns field) within the Pricing Modifier setup
- Create a New Return which will create the RMA from scratch.
- Copy an original order into an order with an RMA Order Type.
- Defective Product
- Customer does not like the product
- Product does not meet the customer’s expectations
- These returns would be for:
- Evaluation Orders
- Samples
- Other orders where the customer was not originally charged for the product.
- These credits are generally used by software companies when the customer destroys the CD or disk and erases the software from their machine, but no physical thing to return.
Process Flow
There are two ways in which to create an RMA in Oracle:
Normal business is delivered with four different RMA Order Types, each with a different Order Cycle:
RMA with Credit is used when the customer is going to be returning a physical product and will also be receiving a credit in Accounts Receivable as a result of the return.These types of returns are for:
RMA no Credit is used when the customer is receiving authorization to return the product but will not be receiving a credit as a result of the return.
RMA Credit Only is used when the customer will be receiving a credit, but the physical return of the product is not required.
RMA with Credit and Approval is used in the same manner as an RMA with Credit but this order cycle includes an approval process that requires someone to approve the RMA before it is booked. In order for an order/return or order/return line approval workflow to work correctly the profile option OM: Notification Approver must have a value.
This section will guide you through a basic flow for a Return for Credit with Receipt, from entry to generating a credit memo, including:
1. Create an RMA having a single line whose originating transaction is unknown
while entering an RMA in the Returns tab, the user will need to enter the Line Type as a return (i.e. Return for Credit with Receipt of Goods) and enter a Return Reason. A Return Reason is required to be entered (i.e. Product Discontinued). Since we did not reference a sales order, we are entering a single line RMA where the originating transaction is unknown.
If you receive the returns partially, and if the Calculate Price Flag is set to Y (Calculate Price) or P (Partial Price), then freight charges get applied automatically on the partially received lines. However if the Calculate Price Flag is set to N, then
the freight charges do not get applied on the partially received lines.
2. Book the RMA
3. Receive the RMA using the Receipts window of Oracle Purchasing
4. Check the on-hand quantity of the item in Inventory to verify that correct quantity was received
5. Fulfill RMA line
The fulfillment activity acts as a synchronization point for all lines on the order that are in a fulfillment set. The lines in the fulfillment set will wait at the fulfillment activity until all the lines in the set have reached the activity. Lines that are not in a fulfillment set simply pass through the activity automatically. The user will not have to perform anything during this step. The eligible lines will automatically be put into a fulfillment set.
6. Generate a Credit MemoThe Workflow process of the return line(s) will be on the Invoice Interface activity, once the Fulfillment activity completes. The invoice interface activity places the information from the return line into the Receivables Interface tables. Once the information is written to the tables, the invoice interface activity is complete, and the line proceeds to the close line activity.
However, note that the credit memo is not actually generated until the Autoinvoice program in Receivables has been run. The credit memo will then be viewable in the Sales Orders window.
To run the Autoinvoice program, the user needs to change responsibilities to Receivables and navigate to the Interfaces window. Select the Autoinvoice Master program and run the program for your RMA # and specify the invoice source as the one associated with the line type of the RMA line. The Autoinvoice Master program will generate the Autoinvoice Import program which 5-50 Oracle Order Management Implementation Manual generates the credit memo. These programs can be setup to run automatically in the background. Just set the programs as 'Deferred.'
7. View the Credit Memo in Order Management
View the credit memo in Order Management. To view the credit memo in Order Management, the user need to change responsibilities to Order Management > Orders, Returns > Order Organizer window. Query your RMA # in the Order
Organizer. Once the RMA is queried, open the RMA order, click Actions and choose Additional Order Information. Once the Additional Order Information window has opened, click on the Receivables tab to view the credit memo. This window will show your the credit memo number and amount.
8. Check the Shipped and Fulfilled quantity on the RMA line
From the above step, navigate in the Sales Orders window to the Line Items tab for the RMA. Scroll to view the Shipped Quantity field. To access the Fulfilled Quantity field, the user needs to use the folder technology to add the field to the sales orders window. To add the field, click on the Warehouse field in the Shipping Tab of the Line Items window. Next, select the Folder menu at the top of the window, select Show Field and choose the Quantity Fulfilled field from the list. The field will populate in the window. The Shipped Quantity means the received quantity for return lines and the Fulfilled Quantity means the delivered quantity for the return lines.